由于众所不周知的原因,国内镜像源也没了,可能有些还能用,最差的情况就是全部都不行了,故到时候需要自建docker镜像,这样只需保持一台机器和官方仓库的连通性即可
自建docker镜像源
目录
[TOC]
自建镜像源,这里介绍两种方法
法一通过docker官方推出的registry
缺点是缺少合适的镜像同步机制
优点是镜像占用空间小
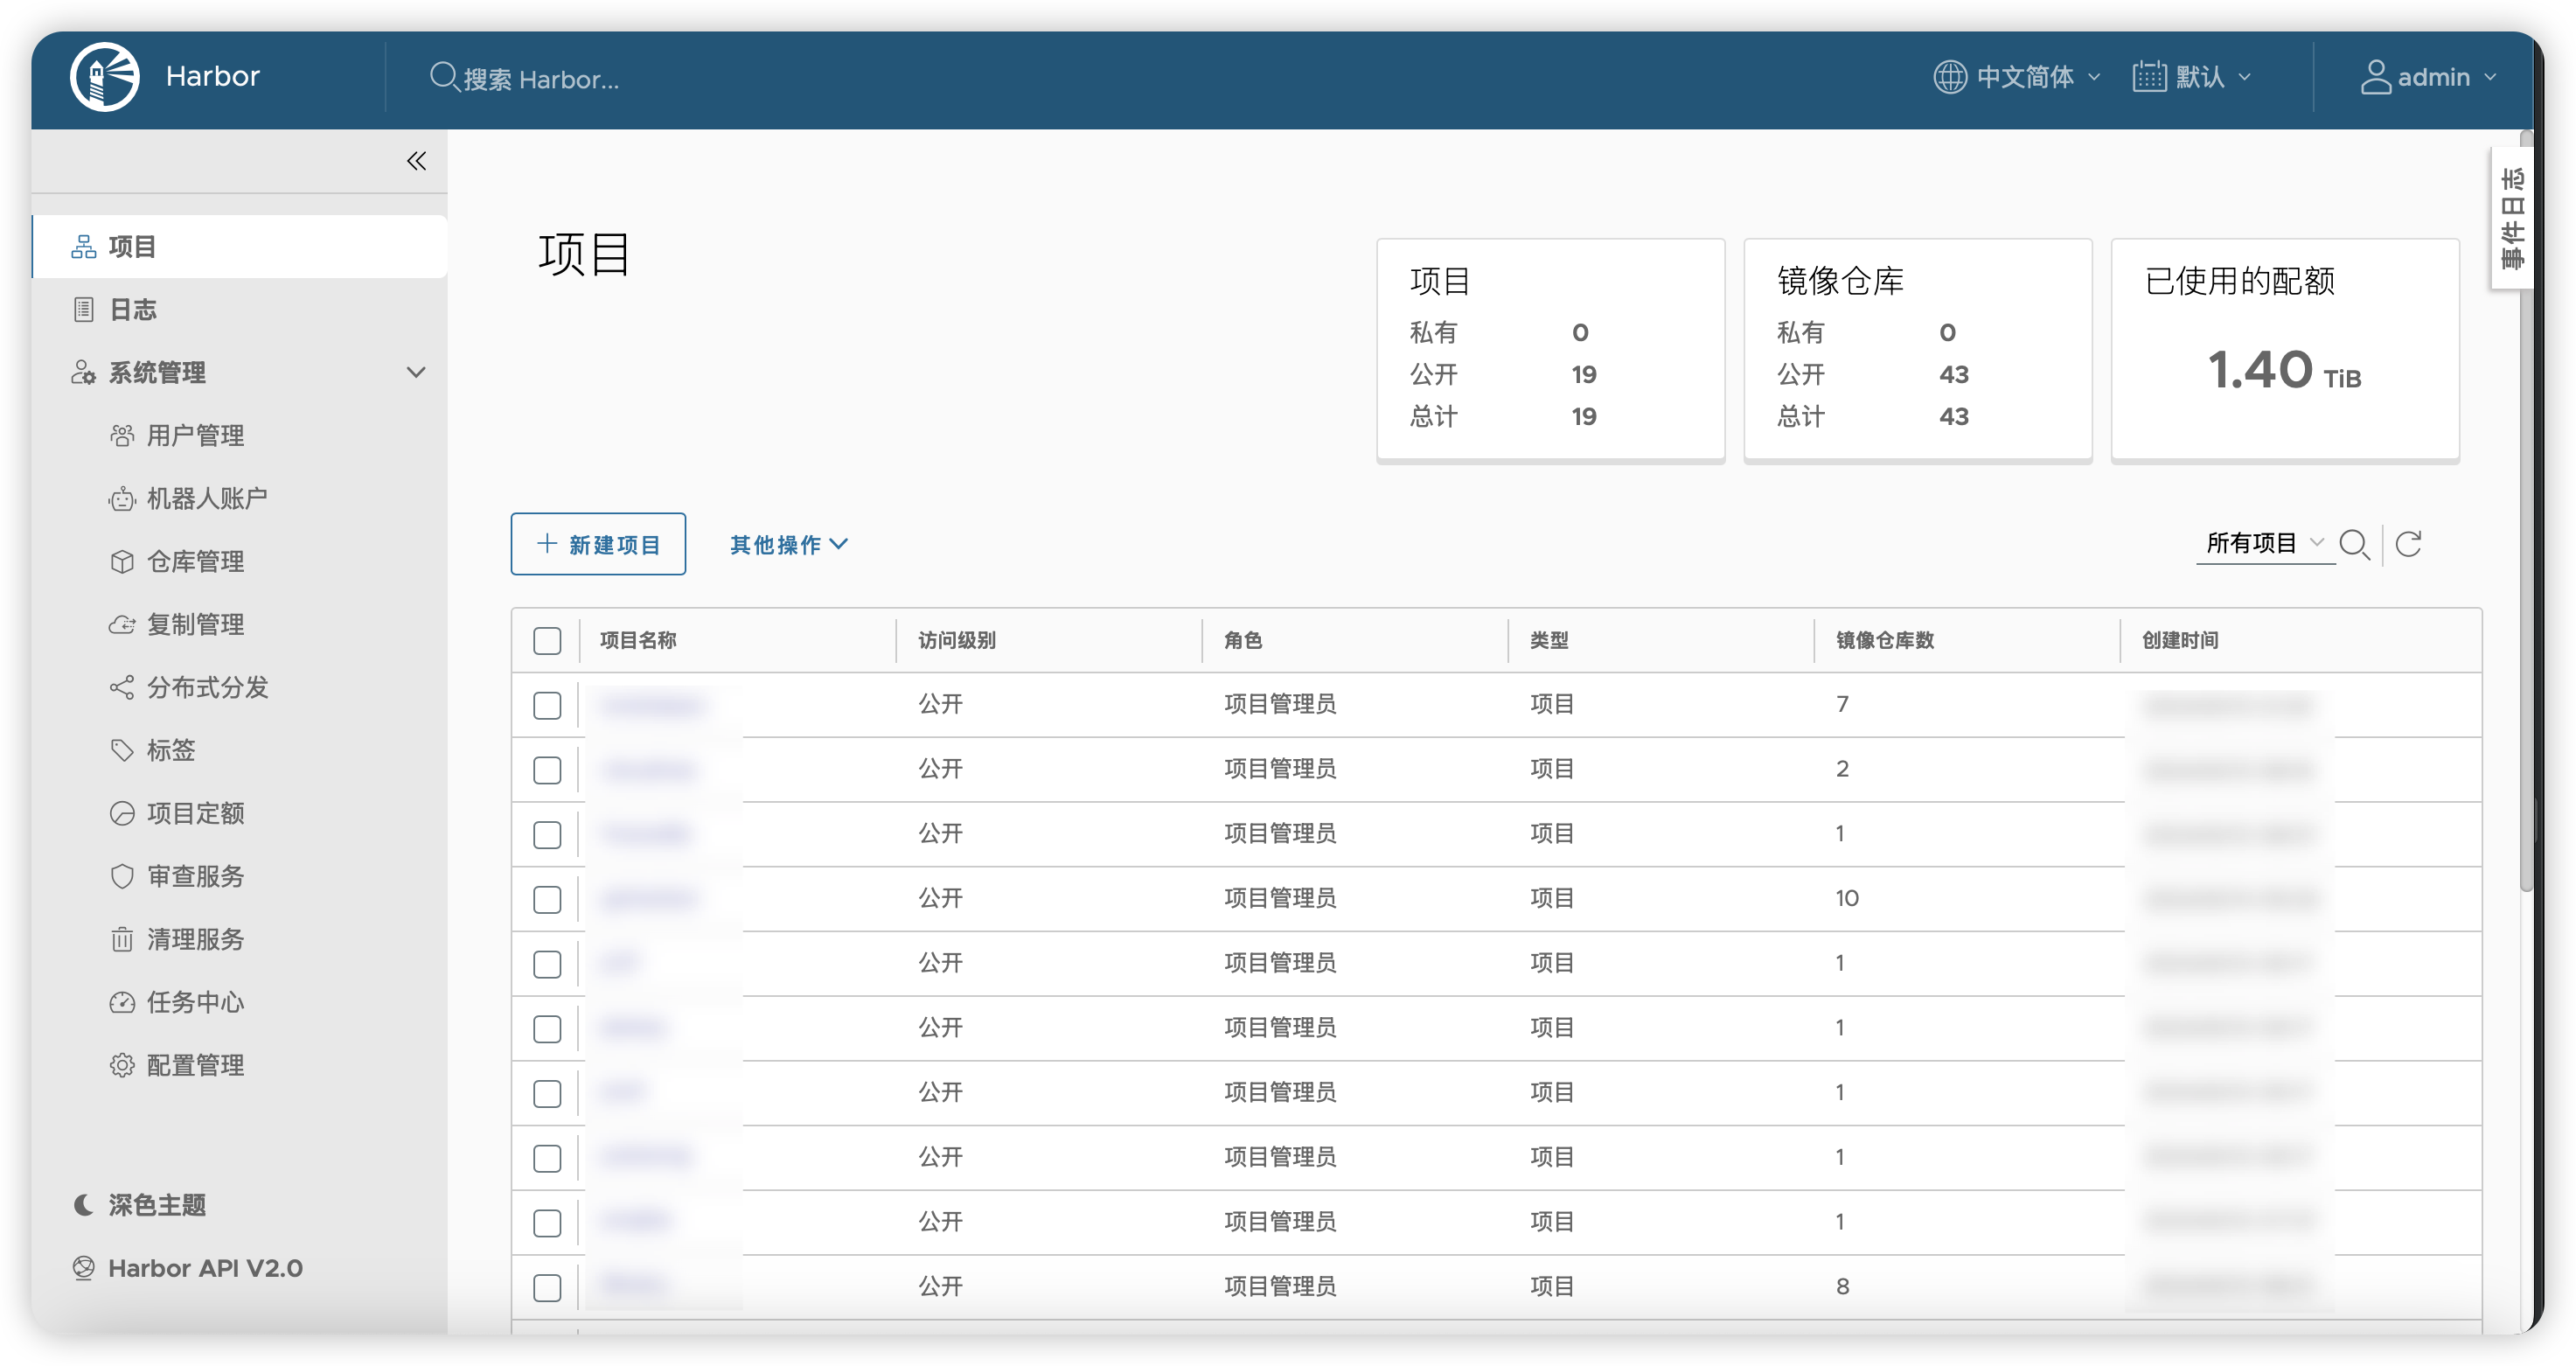
法二是通过harbor(更推荐)
企业级私有Registry服务器
缺点是有点令人望而生畏,10个容器,10个镜像啊,我是服气的,,一个字,6
优点是有一套完整的管理系统;webui有中文;支持多用户管理;本地数据库,而不是像registry一样从文件中现读取
这种方法部署好了,会比法一舒服,毕竟这么多容器摆在这儿
其实我对两种方法都不太满意,但好像又没有更成熟的方案
法一、registry
0.前置条件
安装好docker,docker-compose
1.docker安装nginx
1.1 创建目录
mkdir -p /home/nginx/etc/nginx/conf.d /home/nginx/usr/share/nginx/html /home/nginx/certs /home/nginx/config /home/nginx/config/do.not.even.try也可以用Dockerfile直接设置好,这里就不用Dockerfile了
1.2 创建并编辑nginx.conf
vim /home/nginx/etc/nginx/nginx.conf粘贴如下配置文件进去(如果你不想用这个的话,也可以等后面容器起来以后,再把默认的配置文件复制出来)
user  nginx;
worker_processes  auto;

error_log  /var/log/nginx/error.log notice;
pid        /var/run/nginx.pid;


events {
    worker_connections  1024;
}


http {
    server_tokens off; # 隐藏版本号
    include       /etc/nginx/mime.types;
    default_type  application/octet-stream;

    log_format geoip_enriched '[$time_iso8601] $remote_user 远程地址:$remote_addr | 类型:$scheme | 请求:$request | '
                            '状态码: $status | 发送字节数: $body_bytes_sent | 引荐来源: $http_referer | '
                            'UA: "$http_user_agent" | 代理转发IP: $http_x_forwarded_for | '
                            '国家: $geoip_country | 州/省: $geoip_stateprov | 城市: $geoip_city | '
                            '纬度: $geoip_latitude | 经度: $geoip_longitude | 大洲: $geoip_continent | '
                            '时区: $geoip_timezone | ASN: $geoip_asn | ASN组织: $geoip_asnorganization';

    access_log  /var/log/nginx/access.log  geoip_enriched;


    sendfile        on;
    #tcp_nopush     on;

    client_max_body_size 8G;
    server_names_hash_bucket_size 64;

    keepalive_timeout  65;

    gzip  on;

    include /etc/nginx/conf.d/*.conf;
}:wq保存退出
1.3 创建并编辑nginx的docker-compose.yml
vim /home/nginx/docker-compose.yml粘贴进去(2个模式二选一):
- host模式:(推荐)
其中host模式需要用到的端口由文件夹/home/nginx/etc/nginx/conf.d/中的conf配置文件中listen的端口决定
#version: '3' #新版已经弃用version,如果报错可以取消注释此行
services:
  nginx:
    image: nginx:latest
    container_name: nginx
    network_mode: host
    volumes:
      - ./usr/share/nginx/html:/usr/share/nginx/html
      - ./etc/nginx/nginx.conf:/etc/nginx/nginx.conf
      - ./etc/nginx/conf.d:/etc/nginx/conf.d
      - ./var/log/nginx:/var/log/nginx
      - /home:/home
    restart: always
    environment:
      - TZ=Asia/Shanghai
  geoip:
    image: observabilitystack/geoip-api:latest
    ports:
      - 172.17.0.1:8081:8080
restart: always- bridge模式:
#version: '3' #新版已经弃用version,如果报错可以取消注释此行
services:
  nginx:
    image: nginx:latest
    container_name: nginx
    ports:
      # 端口如果旧版的docker-compose报错就改成第一种,推荐第二种
      # - "8880:8880"
      # - "8443:8443"
      - target: 8880
        published: 8880
        mode: host
      - target: 8443
        published: 8443
        mode: host
    volumes:
      - ./usr/share/nginx/html:/usr/share/nginx/html
      - ./etc/nginx/nginx.conf:/etc/nginx/nginx.conf
      - ./etc/nginx/conf.d:/etc/nginx/conf.d
      - ./var/log/nginx:/var/log/nginx
      - /home:/home
    restart: always
    environment:
      - TZ=Asia/Shanghai
  geoip:
    image: observabilitystack/geoip-api:latest
    ports:
      - 172.17.0.1:8081:8080
    restart: always
本文使用的是非标端口,如果你要用80 443的话,可以把全文中的
8443替换为443,把8880替换为80按照上面的流程下来以后,目录应该长这样(可能有些文件还没有,这是最终的样子)
# root @ ubuntu in ~
$ tree /home/nginx
/home/nginx
├── certs
│   └── xxx.com
│       ├── cert.pem
│       ├── chain.pem
│       ├── fullchain.pem
│       └── privkey.pem
├── config
│   ├── cloudflare.ini
│   ├── get_cert.sh
│   ├── log
│   │   ├── letsencrypt.log
│   │   └── renew.log
│   ├── do.not.even.try
│   └── renew.sh
├── docker-compose.yml
├── etc
│   └── nginx
│       ├── conf.d
│       │   ├── xxx.com.conf
│       └── nginx.conf
├── usr
│   └── share
│       └── nginx
│           └── html
│               └── index.html
└── var
└── log
└── nginx
├── access.log
└── error.log
2.docker安装registry和registry-ui
2.1 创建目录
mkdir -p /home/docker-registry2.2 编辑docker-compose.yml
vim /home/docker-registry/docker-compose.ymlversion: '3'
services:
registry-server:
image: registry:2.8.2
restart: always
ports:
- '172.17.0.1:5000:5000'
environment:
REGISTRY_HTTP_HEADERS_Access-Control-Origin: '["*"]'
REGISTRY_HTTP_HEADERS_Access-Control-Allow-Methods: '[HEAD,GET,OPTIONS,DELETE]'
REGISTRY_HTTP_HEADERS_Access-Control-Credentials: '[true]'
REGISTRY_HTTP_HEADERS_Access-Control-Allow-Headers: '[Authorization,Accept,Cache-Control]'
REGISTRY_HTTP_HEADERS_Access-Control-Expose-Headers: '[Docker-Content-Digest]'
REGISTRY_STORAGE_DELETE_ENABLED: 'true'
volumes:
- ./registry-server:/var/lib/registry
container_name: registry-server
registry-ui:
image: joxit/docker-registry-ui:main
restart: always
ports:
- '172.17.0.1:52380:80'
environment:
- SINGLE_REGISTRY=true
- REGISTRY_TITLE=Docker Registry UI
- DELETE_IMAGES=true
- SHOW_CONTENT_DIGEST=true
- NGINX_PROXY_PASS_URL=http://registry-server:5000
- SHOW_CATALOG_NB_TAGS=true
- CATALOG_MIN_BRANCHES=1
- CATALOG_MAX_BRANCHES=1
- TAGLIST_PAGE_SIZE=100 # 推荐改成5
- REGISTRY_SECURED=false
- CATALOG_ELEMENTS_LIMIT=1000
container_name: registry-ui:wq保存退出
./registry-server这个目录你是要通过其他方式挂载过来还是怎么样你自己处理
By default, the registry stores its data on the local filesystem, whether you use a bind mount or a volume. You can store the registry data in an Amazon S3 bucket, Google Cloud Platform, or on another storage back-end by using storage drivers. For more information, see storage configuration options.
2.3启动registry容器
docker-compose -f /home/docker-registry/docker-compose.yml up -d2.4 测试registry和registry-ui是否正常
curl 172.17.0.1:52380返回:
$ curl 172.17.0.1:52380
<!--
 Copyright (C) 2016-2023 Jones Magloire @Joxit

 This program is free software: you can redistribute it and/or modify
 it under the terms of the GNU Affero General Public License as published by
 the Free Software Foundation, either version 3 of the License, or
 (at your option) any later version.

 This program is distributed in the hope that it will be useful,
 but WITHOUT ANY WARRANTY; without even the implied warranty of
 MERCHANTABILITY or FITNESS FOR A PARTICULAR PURPOSE.  See the
 GNU Affero General Public License for more details.

 You should have received a copy of the GNU Affero General Public License
 along with this program.  If not, see <http://www.gnu.org/licenses/>.
--><!DOCTYPE html><html><head><meta charset="UTF-8" /><link href="docker-registry-ui.css" rel="stylesheet" type="text/css"><meta name="viewport" content="width=device-width, initial-scale=1" /><meta property="og:site_name" content="Docker Registry UI" /><meta name="twitter:card" content="summary" /><meta name="twitter:site" content="@Joxit" /><meta name="twitter:creator" content="@Jones Magloire" /><title>Docker Registry UI</title></head><body><docker-registry-ui
      registry-url=""
      name="Docker Registry UI"
      pull-url=""
      show-content-digest="true"
      show-tag-history=""
      is-image-remove-activated="true"
      catalog-elements-limit="1000"
      single-registry="true"
      default-registries=""
      read-only-registries=""
      show-catalog-nb-tags="true"
      history-custom-labels=""
      use-control-cache-header=""
      taglist-order=""
      catalog-default-expanded=""
      catalog-min-branches="1"
      catalog-max-branches="1"
      is-registry-secured="false"
      theme=""
      theme-primary-text=""
      theme-neutral-text=""
      theme-background=""
      theme-hover-background=""
      theme-accent-text=""
      theme-header-accent-text=""
      theme-header-text=""
      theme-header-background=""
      theme-footer-text=""
      theme-footer-neutral-text=""
      theme-footer-background=""
      tags-per-page="100"
    ></docker-registry-ui><script src="docker-registry-ui.js"></script></body></html>#
curl 172.17.0.1:5000/v2/_catalog返回:
$ curl 172.17.0.1:5000/v2/_catalog
{"repositories":[]}
curl 172.17.0.1:52380/v2/_catalog返回:
$ curl 172.17.0.1:52380/v2/_catalog
{"repositories":[]}
3.杂项
本文通过certbot获取ssl证书,安装certbot推荐使用snap安装,用apt容易拉到旧版的
并且这里采用的是cloudflare的dns验证,所以需要你有cf的api
3.1 安装snapd
apt install snapd
sudo systemctl enable snapd
sudo systemctl start snapd
3.2 安装certbot
sudo snap install --classic certbot3.3 安装certbot dns cf插件
sudo snap set certbot trust-plugin-with-root=ok
sudo snap install certbot-dns-cloudflare
3.4 安装htpasswd
sudo apt install apache2-utils3.5 生成密码
htpasswd -Bc /home/docker-registry/registry.passwords name3.6 将cloudflare的api放进配置文件中
vim /home/nginx/config/cloudflare.inidns_cloudflare_email = [email protected]
dns_cloudflare_api_key = xxxxxxxxxxxxxxxxxxxxxxxxxxxxxxxxxxxxx3.7 给cloudflare.ini设置权限
chmod 600 /home/nginx/config/cloudflare.ini4.解析域名xxx.com到当前主机ip
5.nginx反代registry-ui
5.1 编辑conf.d中的配置文件
vim /home/nginx/etc/nginx/conf.d/xxx.com.conf粘贴进来:
# websocket支持
map $http_upgrade $connection_upgrade {
    default upgrade;
    '' close;
}
server {
    listen 8880;
    listen [::]:8880;
    http2 on;
    server_name xxx.com;

    access_log /var/log/nginx/xxx.com_access.log geoip_enriched;
    error_log /var/log/nginx/xxx.com_error.log;

    return 301 https://$host:8443$request_uri;
}
server {
    listen 8443 ssl;
    listen [::]:8443 ssl;
    http2 on;
    server_name xxx.com;

    auth_request @geoip;

    # 从auth_request返回的头信息中提取变量
    auth_request_set $geoip_country $upstream_http_x_geoip_country;
    auth_request_set $geoip_stateprov $upstream_http_x_geoip_stateprov;
    auth_request_set $geoip_city $upstream_http_x_geoip_city;
    auth_request_set $geoip_latitude $upstream_http_x_geoip_latitude;
    auth_request_set $geoip_longitude $upstream_http_x_geoip_longitude;
    auth_request_set $geoip_continent $upstream_http_x_geoip_continent;
    auth_request_set $geoip_timezone $upstream_http_x_geoip_timezone;
    auth_request_set $geoip_asn $upstream_http_x_geoip_asn;
    auth_request_set $geoip_asnorganization $upstream_http_x_geoip_asnorganization;

    # 将提取到的变量添加到头信息中
    add_header X-Geoip-Country $geoip_country always;
    add_header X-Geoip-StateProv $geoip_stateprov always;
    add_header X-Geoip-City $geoip_city always;
    add_header X-Geoip-Latitude $geoip_latitude always;
    add_header X-Geoip-Longitude $geoip_longitude always;
    add_header X-Geoip-Continent $geoip_continent always;
    add_header X-Geoip-Timezone $geoip_timezone always;
    add_header X-Geoip-Asn $geoip_asn always;
    add_header X-Geoip-AsnOrganization $geoip_asnorganization always;

    ssl_certificate /home/nginx/certs/xxx.com/fullchain.pem;
    ssl_certificate_key /home/nginx/certs/xxx.com/privkey.pem;

    # 启动HSTS
    add_header Strict-Transport-Security "max-age=63072000; includeSubDomains; preload" always;

    # 强制使用安全协议
    ssl_protocols TLSv1.2 TLSv1.3;
    ssl_prefer_server_ciphers on;
    ssl_ciphers 'ECDHE-ECDSA-AES256-GCM-SHA384:ECDHE-RSA-AES256-GCM-SHA384:ECDHE-ECDSA-CHACHA20-POLY1305:ECDHE-RSA-CHACHA20-POLY1305:ECDHE-ECDSA-AES128-GCM-SHA256:ECDHE-RSA-AES128-GCM-SHA256';
    ssl_session_cache shared:SSL:10m;
    ssl_session_timeout 10m;

    access_log /var/log/nginx/xxx.com_access.log geoip_enriched;
    error_log /var/log/nginx/xxx.com_error.log;

    location / {
        proxy_pass http://172.17.0.1:52380;

        # 隐藏X-Powered-By
        proxy_hide_header X-Powered-By;

        # register的反代必须要有这几个,不然有几率push会报错
        proxy_set_header Host       $http_host;
        proxy_set_header X-Real-IP     $remote_addr;
        proxy_set_header X-Forwarded-For  $proxy_add_x_forwarded_for;

        #cloudflare真实ip,如果使用了cf的cdn需要取消注释下面两行
        # set_real_ip_from 0.0.0.0/0;
        # real_ip_header CF-Connecting-IP;

        proxy_set_header X-Forwarded-Proto $scheme;
        proxy_read_timeout         900;

        # websocket支持
        proxy_set_header Upgrade $http_upgrade;
        proxy_set_header Connection $connection_upgrade;

        proxy_set_header Connection $http_connection;
        proxy_http_version 1.1;

        # 密码验证 (可选)
        # auth_basic "Registry Realm"; #(可选)
        # auth_basic_user_file /home/docker-registry/registry.passwords;# (可选)

    }
    location = @geoip {
      internal;

      proxy_pass http://172.17.0.1:8081/;
      # proxy_pass_request_body off;
      proxy_set_header X-Geoip-Address $remote_addr;
    }
}
其实这里的
密码验证也可以放进registry的docker-compose.yml中,但我更倾向于nginx其中
xxx.com批量替换成你的域名即可,其他的可以不动如果不想要密码验证的话也可以把
auth_basic那两行注释掉
:wq保存退出
6.获取ssl证书
6.1 创建并编辑自定义脚本get_cert.sh
vim /home/nginx/config/get_cert.sh#!/bin/bash
# 传入的域名参数
DOMAIN=$1
# Certbot 配置文件路径
CLOUDFLARE_INI_PATH="/home/nginx/config/cloudflare.ini"
# 证书生成的路径前缀
CERT_BASE_DIR="/etc/letsencrypt"
# 目标路径
TARGET_DIR="/home/nginx/certs/$DOMAIN"
# 检查目标目录是否存在
if [ ! -d "$TARGET_DIR" ]; then
mkdir -p "$TARGET_DIR"
fi
# 函数:检查证书是否即将过期(30天内)
check_cert_expiry() {
if [ -f "$TARGET_DIR/fullchain.pem" ]; then
EXPIRY_DATE=$(openssl x509 -enddate -noout -in "$TARGET_DIR/fullchain.pem" | cut -d= -f2)
EXPIRY_TIMESTAMP=$(date -d "$EXPIRY_DATE" +%s)
CURRENT_TIMESTAMP=$(date +%s)
DAYS_LEFT=$(( ($EXPIRY_TIMESTAMP - $CURRENT_TIMESTAMP) / 86400 ))
if [ $DAYS_LEFT -gt 30 ]; then
echo "The certificate for $DOMAIN is still valid for $DAYS_LEFT days."
exit 0
fi
fi
}
# 检查证书是否存在并且是否即将过期
check_cert_expiry
# 申请新证书
sudo certbot certonly --dns-cloudflare --dns-cloudflare-credentials "$CLOUDFLARE_INI_PATH" -d "$DOMAIN" -n --agree-tos --logs-dir /home/nginx/config/log --email [email protected]
# 检查证书生成是否成功
if [ $? -ne 0 ]; then
echo "Certbot failed to obtain the certificate for $DOMAIN."
exit 1
fi
# 获取实际生成证书的目录
CERT_DIR=$(sudo ls -d ${CERT_BASE_DIR}/live/${DOMAIN}* | sort -V | tail -n 1)
# 复制文件,并在复制成功后执行删除操作
cp "$CERT_DIR/fullchain.pem" "$TARGET_DIR/" && \
cp "$CERT_DIR/privkey.pem" "$TARGET_DIR/" && \
cp "$CERT_DIR/chain.pem" "$TARGET_DIR/" && \
cp "$CERT_DIR/cert.pem" "$TARGET_DIR/" && \
# 如果复制成功了,则删除原始证书
rm -r $CERT_BASE_DIR/live/* && \
rm -r $CERT_BASE_DIR/archive/*
echo "Certificate for $DOMAIN has been successfully obtained and placed in $TARGET_DIR.":wq保存退出
P.S. 其中的
[email protected]需要修改,不然运行的时候会报错Unable to register an account with ACME server. The ACME server believes [email protected] is an invalid email address. Please ensure it is a valid email and attempt registration again.
6.2 创建并编辑自定义脚本renew.sh
vim /home/nginx/config/renew.sh#!/bin/bash
# 获取当前日期和时间
current_time=$(date +"%Y-%m-%d %H:%M:%S")
echo "" >> /home/nginx/config/log/renew.log
echo "start renew at: $current_time" >> /home/nginx/config/log/renew.log
# 获取 /home/nginx/certs 目录下的所有子目录名称
certs_dirs=$(find /home/nginx/certs -maxdepth 1 -mindepth 1 -type d -exec basename {} \;)
# 循环遍历每个子目录并执行指定的 zsh 命令
for dir in $certs_dirs; do
zsh /home/nginx/config/get_cert.sh "$dir" >> /home/nginx/config/log/renew.log
done
echo "renew complete at: $current_time" >> /home/nginx/config/log/renew.log6.3 给予以上俩个脚本可执行权限
chmod +x /home/nginx/config/*.sh6.4 获取ssl证书
zsh /home/nginx/config/get_cert.sh xxx.com或者你用bash的话就把zsh改成bash
返回类似如下内容即申请成功:
$ zsh /home/nginx/config/get_cert.sh xxx.com
Saving debug log to /home/nginx/config/log/letsencrypt.log
Account registered.
Requesting a certificate for xxx.com
Unsafe permissions on credentials configuration file: /home/nginx/config/cloudflare.ini
Waiting 10 seconds for DNS changes to propagate

Successfully received certificate.
Certificate is saved at: /etc/letsencrypt/live/xxx.com/fullchain.pem
Key is saved at:         /etc/letsencrypt/live/xxx.com/privkey.pem
This certificate expires on 2024-09-07.
These files will be updated when the certificate renews.
Certbot has set up a scheduled task to automatically renew this certificate in the background.

- - - - - - - - - - - - - - - - - - - - - - - - - - - - - - - - - - - - - - - -
If you like Certbot, please consider supporting our work by:
 * Donating to ISRG / Let's Encrypt:   https://letsencrypt.org/donate
 * Donating to EFF:                    https://eff.org/donate-le
- - - - - - - - - - - - - - - - - - - - - - - - - - - - - - - - - - - - - - - -
Certificate for xxx.com has been successfully obtained and placed in /home/nginx/certs/xxx.com.
现在你看目录就能看见证书:
ls -la /home/nginx/certs/*/$ ls -la /home/nginx/certs/*/
total 24
drwxr-xr-x 2 root root 4096 Jun 10 00:29 .
drwxr-xr-x 3 root root 4096 Jun 10 00:27 ..
-rw-r--r-- 1 root root 1302 Jun 10 00:29 cert.pem
-rw-r--r-- 1 root root 1566 Jun 10 00:29 chain.pem
-rw-r--r-- 1 root root 2868 Jun 10 00:29 fullchain.pem
-rw------- 1 root root 241 Jun 10 00:29 privkey.pem6.5 ssl证书自动更新
crontab -e将下面的两行加到文件最后:
# 自动刷新nginx的ssl证书
20 */8 * * * bash /home/nginx/config/renew.sh
6.6 启动nginx容器
docker-compose -f /home/nginx/docker-compose.yml up -d6.7 测试nginx配置文件
这次和5.2测试nginx配置文件不一样的是多了ssl证书,就可以成功了
docker exec -it nginx nginx -t$ docker exec -it nginx nginx -t
nginx: the configuration file /etc/nginx/nginx.conf syntax is ok
nginx: configuration file /etc/nginx/nginx.conf test is successful6.8 上一步测试成功后重载nginx
docker exec -it nginx nginx -s reload执行后不会有任何返回
6.9 打开网页测试
浏览器打开
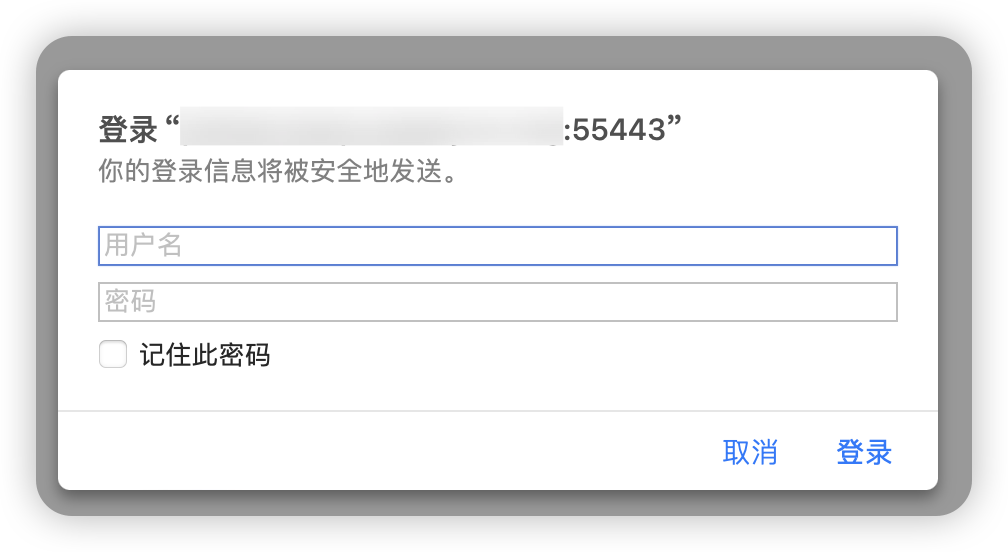
https://xxx.com:8443会看到需要输入用户名和密码,也即是3.5 生成密码中设置的用户名和密码
登录进去就能看见
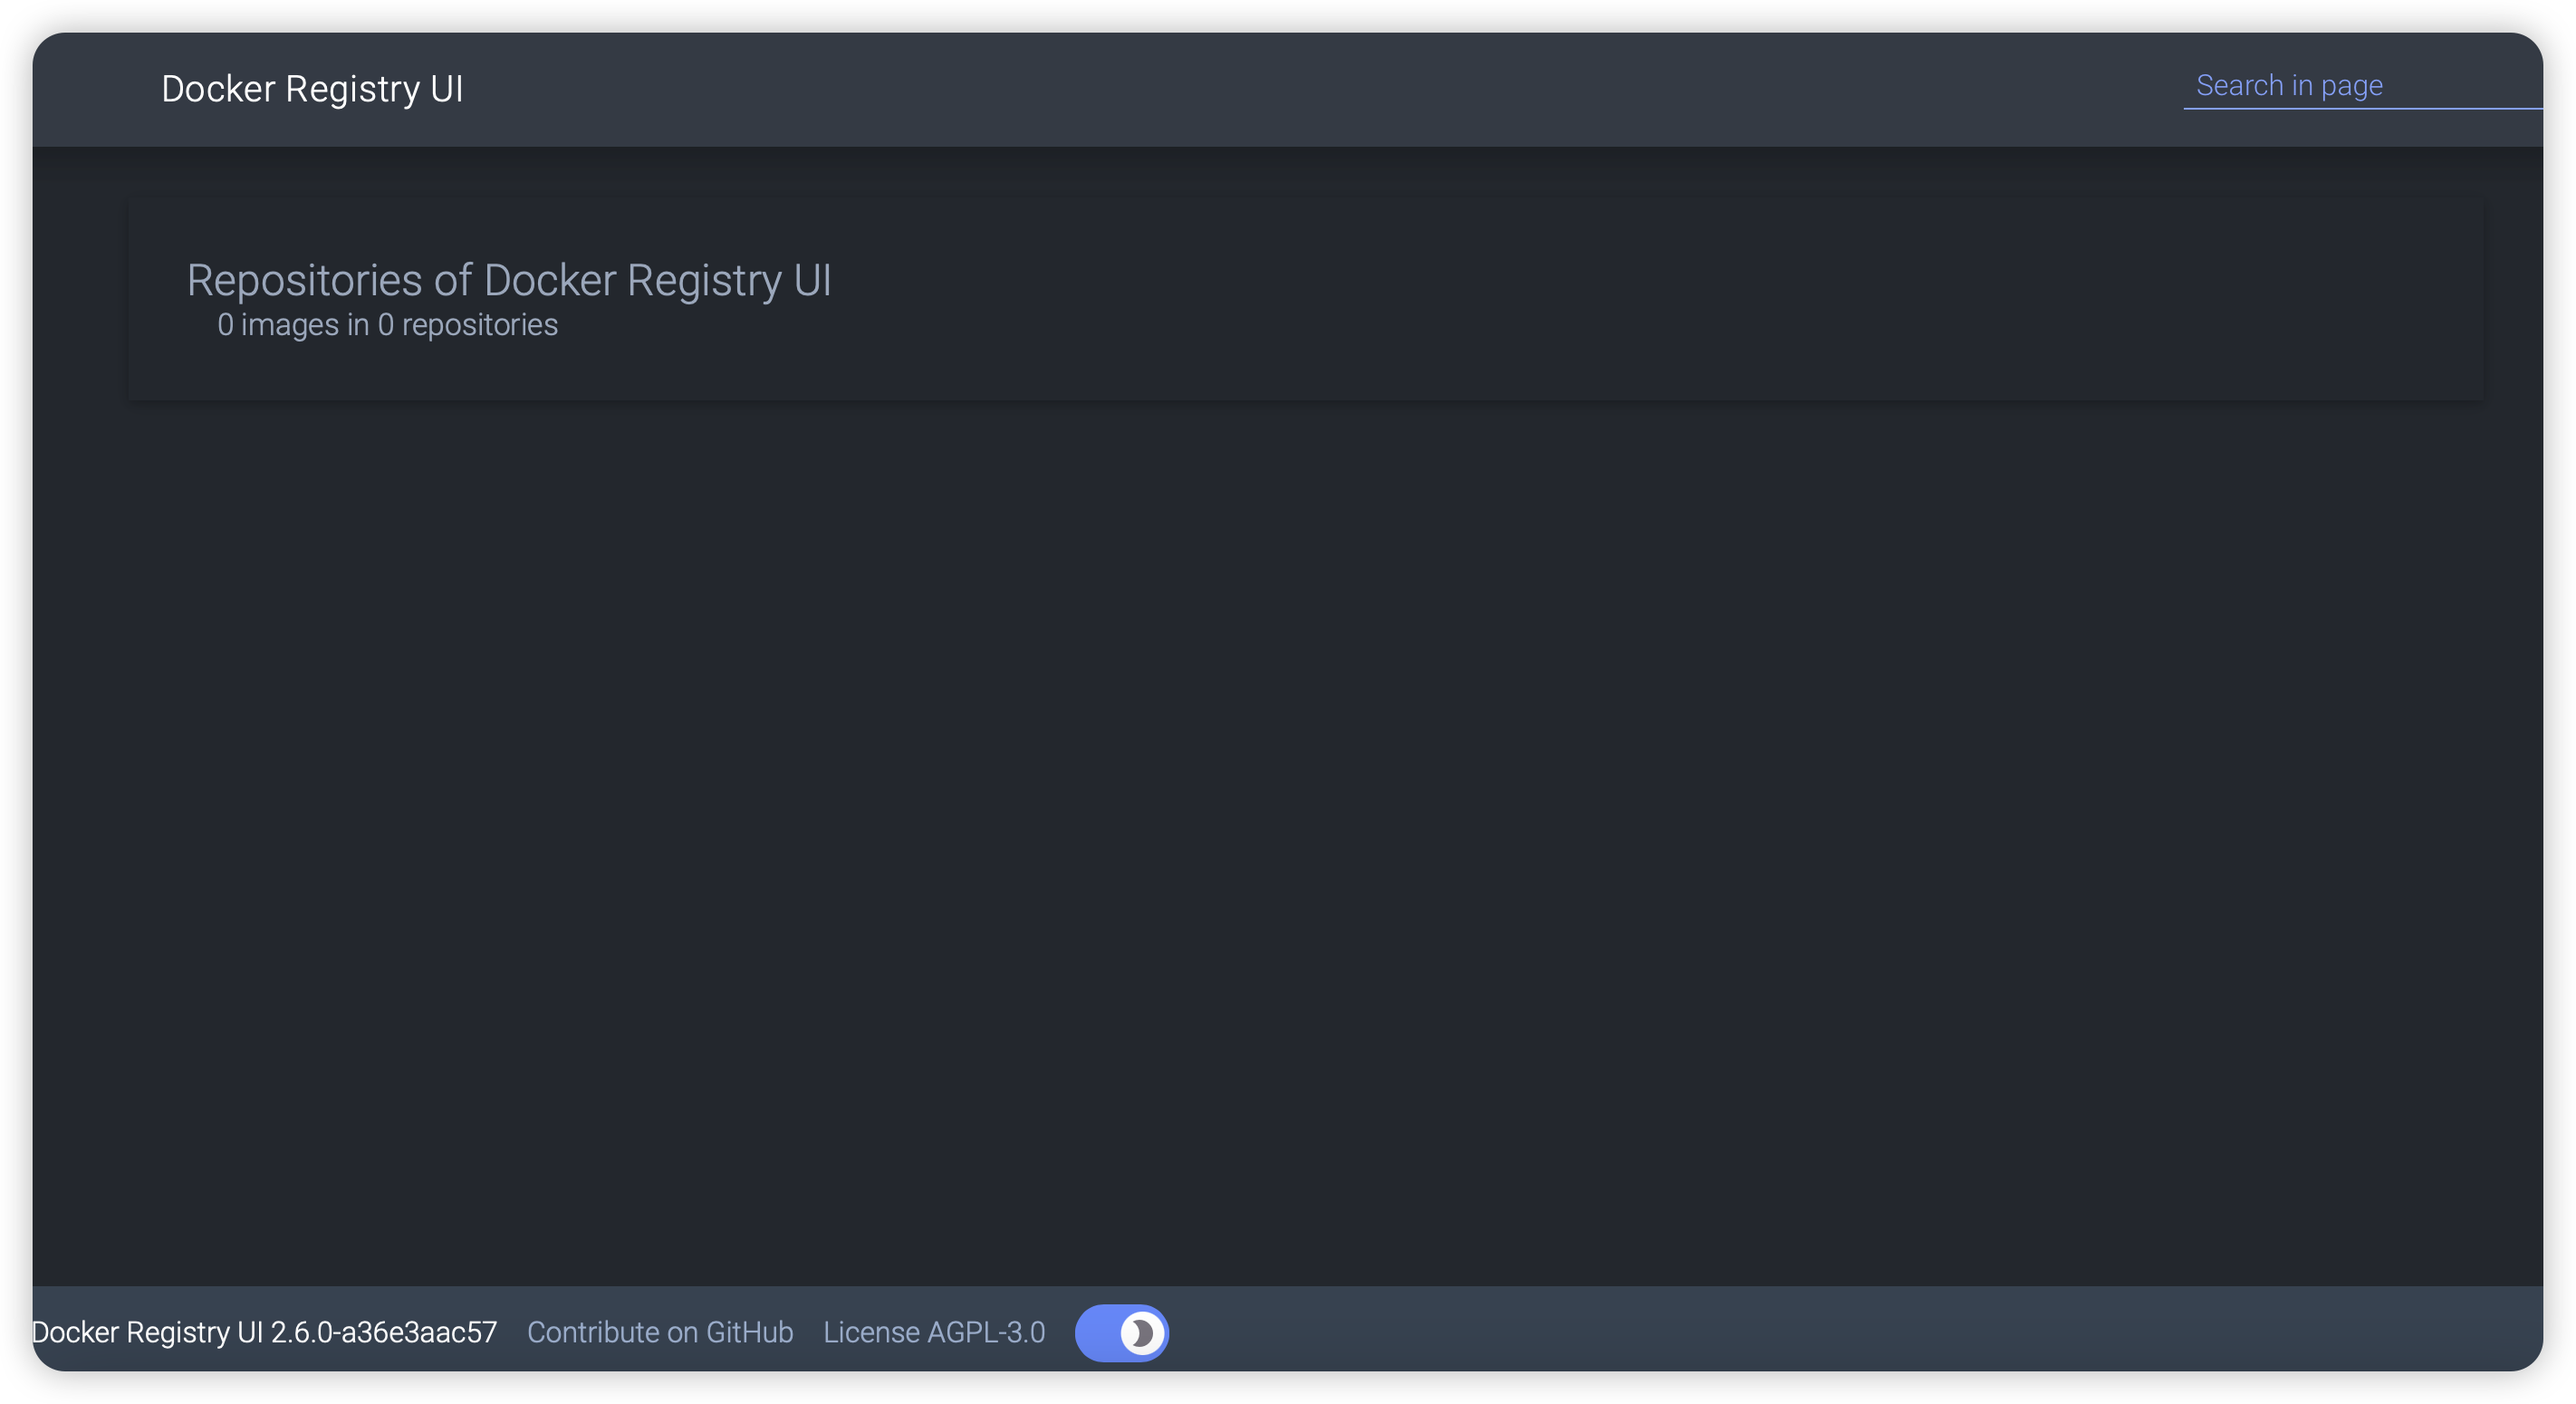
此时registry中还是空的,可以尝试手动添加一个镜像进去
先登录:
docker login xxx.com:8443不要加https://,加了会报错,除非你的网址是127.0.0.1或localhost
返回:
$ docker login xxx.com:8443
Username: admin
Password:
WARNING! Your password will be stored unencrypted in /root/.docker/config.json.
Configure a credential helper to remove this warning. See
https://docs.docker.com/engine/reference/commandline/login/#credentials-store
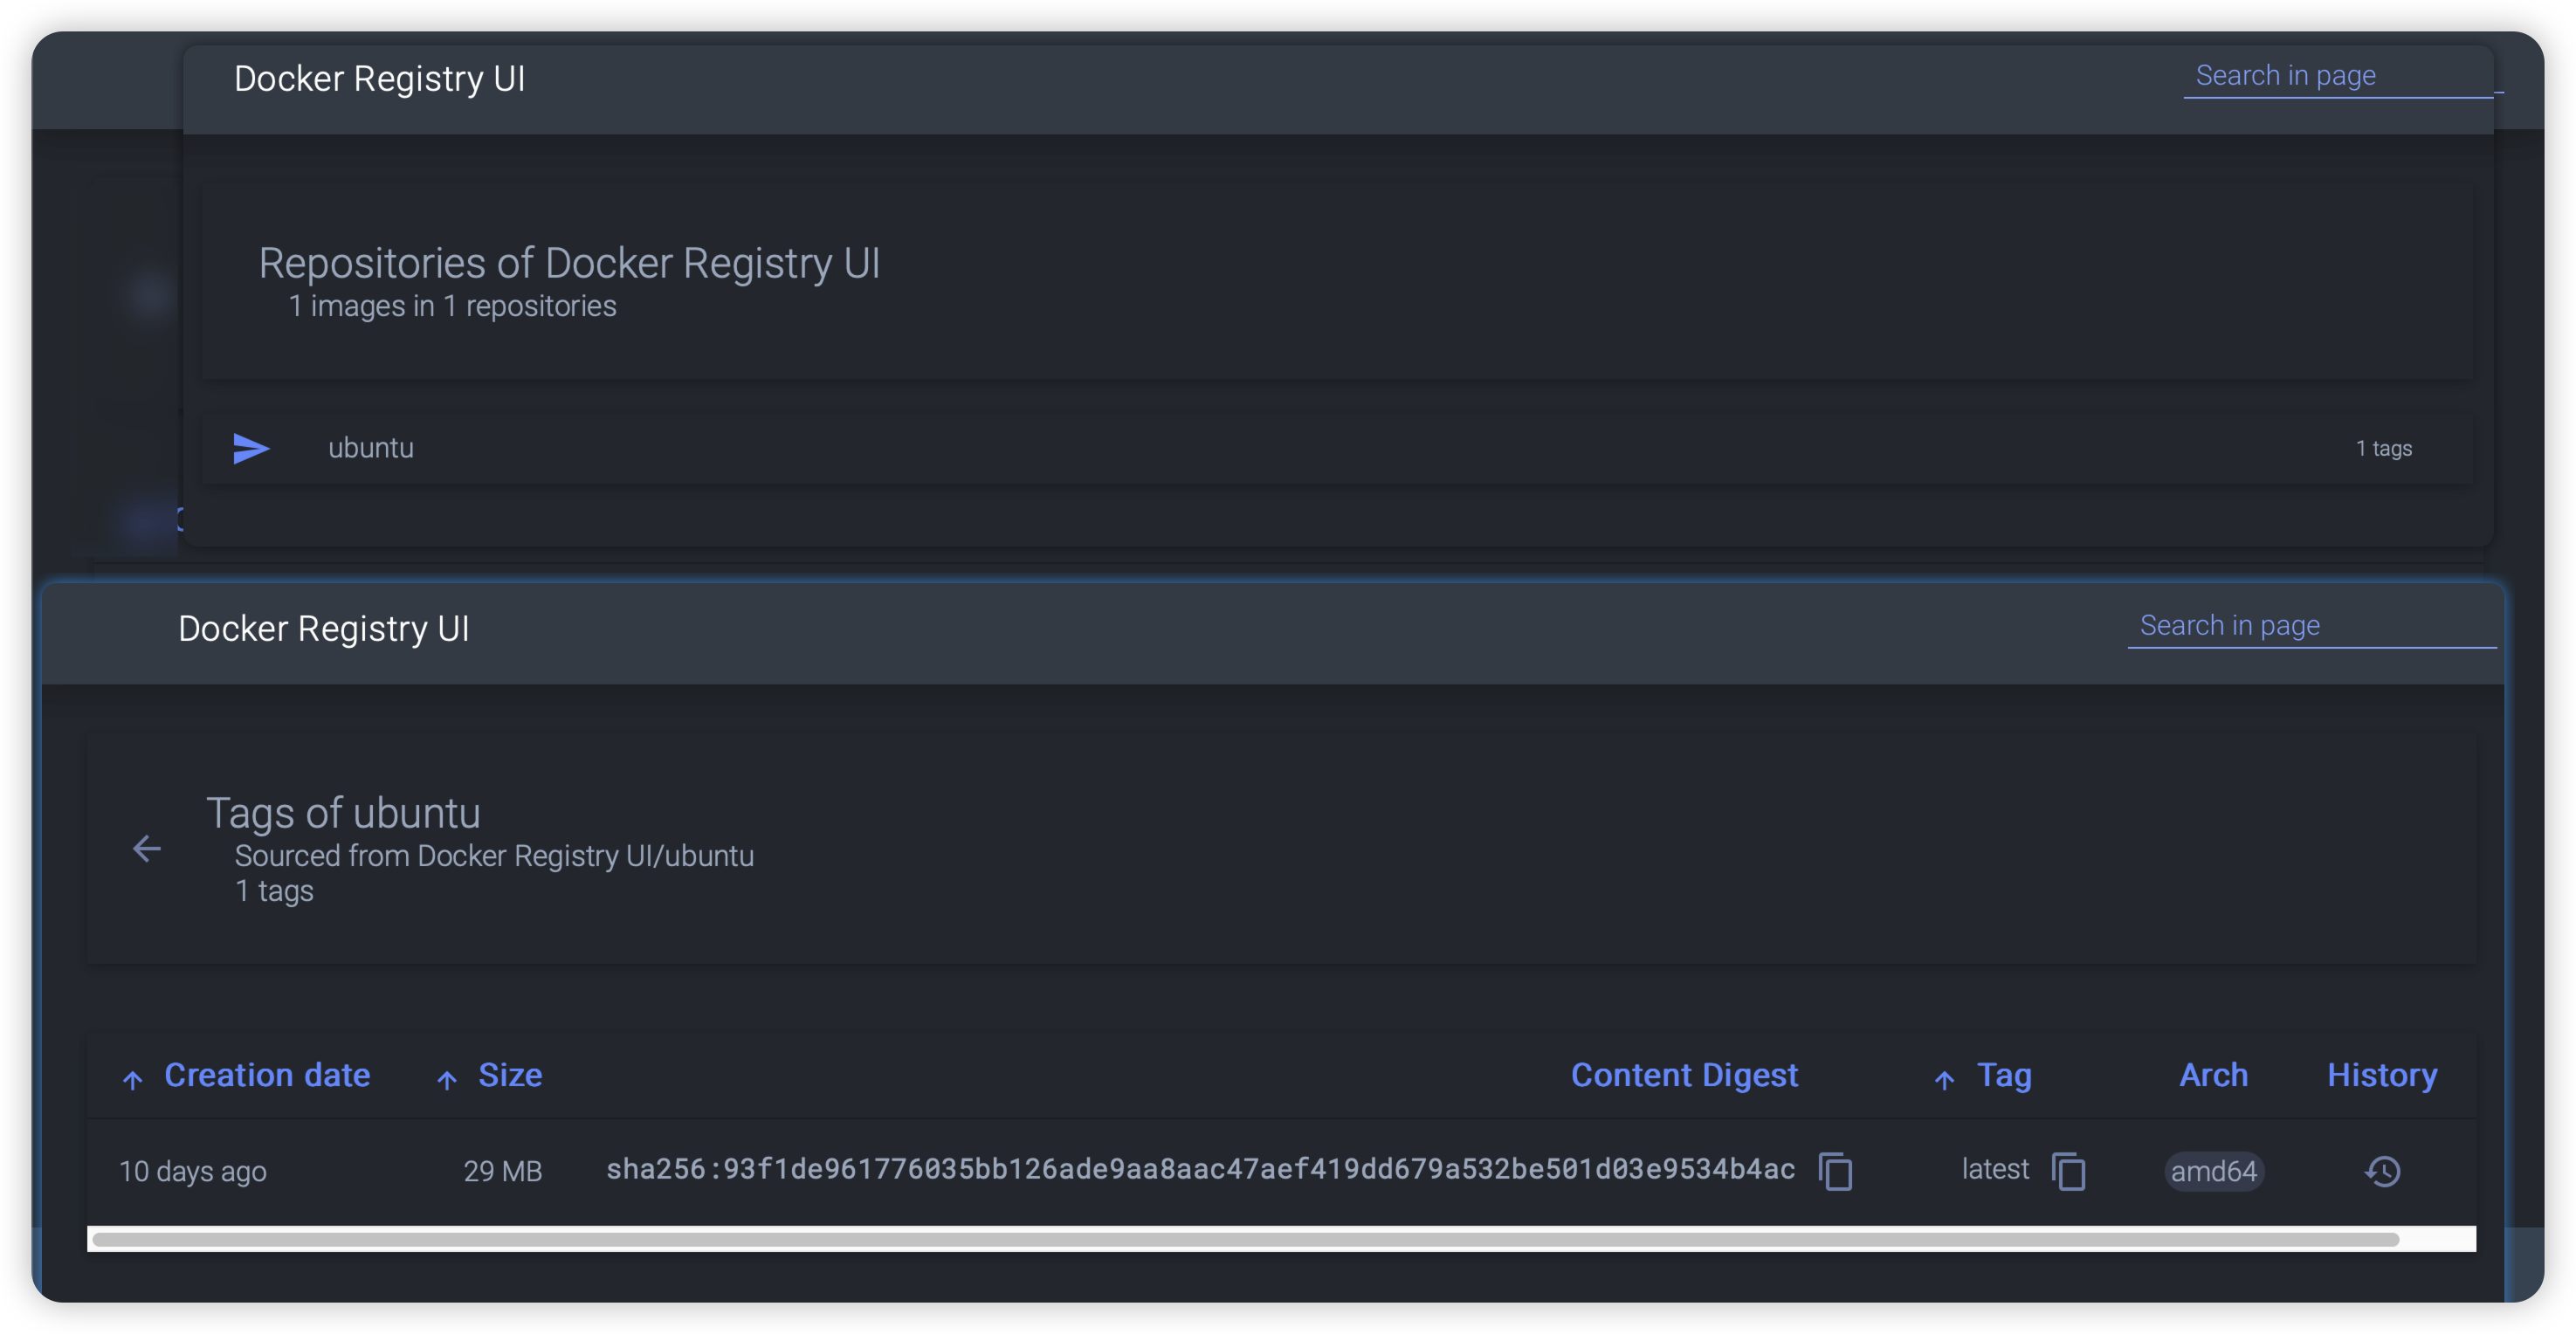
Login Succeeded然后再从官方仓库拉取一个镜像重命名后推送到registry中:
docker pull ubuntu:latest
docker tag ubuntu:latest xxx.com:8443/ubuntu:latest
docker push xxx.com:8443/ubuntu:latest
返回:
$ docker pull ubuntu:latest
docker tag ubuntu:latest xxx.com:8443/ubuntu:latest
docker push xxx.com:8443/ubuntu:latest

latest: Pulling from library/ubuntu
00d679a470c4: Pull complete
Digest: sha256:e3f92abc0967a6c19d0dfa2d55838833e947b9d74edbcb0113e48535ad4be12a
Status: Downloaded newer image for ubuntu:latest
docker.io/library/ubuntu:latest
The push refers to repository [xxx.com:8443/ubuntu]
42d3f8788282: Pushed
latest: digest: sha256:93f1de961776035bb126ade9aa8aac47aef419dd679a532be501d03e9534b4ac size: 529
可以看到push成功,刷新网页就能看见了
7.打开logrotate,防止日志过大
系统一般自带的,如果没有自带就手动安装一下
sudo apt-get install logrotate7.1 创建并编辑/etc/logrotate.d/nginx配置文件
vim /etc/logrotate.d/nginx/home/nginx/var/log/nginx/*.log {
weekly
missingok
rotate 180
compress
delaycompress
notifempty
create 0640 www-data adm
sharedscripts
postrotate
docker exec nginx nginx -s reopen
endscript
}说明:
missingok:7天轮换一次。
missingok:如果日志文件不存在,继续进行轮换。
rotate 180:保留180天的日志文件,超过的日志文件将被删除。
compress:压缩轮换后的日志文件。
delaycompress:延迟一天压缩日志文件,以便查看最新的日志内容。
notifempty:如果日志文件为空,则不进行轮换。
create 0640 www-data adm:创建新的日志文件,设置权限为0640,所有者为 www-data:adm。
(如果是root root的话,这里可以改成
create 0644 root root)sharedscripts:共享脚本模式,确保在所有日志文件轮换完成后只执行一次 postrotate 中的脚本。
postrotate:在日志轮换后执行的脚本部分,这里使用 docker exec 命令向 Nginx 容器发送信号重新打开日志文件。
endscript:脚本结束标志。
7.2 检查 logrotate 配置文件的语法和有效性
sudo logrotate -d /etc/logrotate.d/nginx执行后会返回:
# root @ Ubuntu in /home/nginx/var/log/nginx [22:41:02]
$ sudo logrotate -d /etc/logrotate.d/nginx
WARNING: logrotate in debug mode does nothing except printing debug messages!  Consider using verbose mode (-v) instead if this is not what you want.

reading config file /etc/logrotate.d/nginx
Reading state from file: /var/lib/logrotate/status
Allocating hash table for state file, size 64 entries
Creating new state
Creating new state
Creating new state
Creating new state
Creating new state
Creating new state
Creating new state
Creating new state
Creating new state
Creating new state
Creating new state
Creating new state
Creating new state
Creating new state
Creating new state
Creating new state
Creating new state
Creating new state
Creating new state
Creating new state
Creating new state
Creating new state
Creating new state
Creating new state
Creating new state
Creating new state
Creating new state

Handling 1 logs

rotating pattern: /home/nginx/var/log/nginx/*.log  after 1 days (180 rotations)
empty log files are not rotated, old logs are removed
considering log /home/nginx/var/log/nginx/access.log
Creating new state
  Now: 2024-06-29 22:42
  Last rotated at 2024-06-29 22:00
  log does not need rotating (log has been already rotated)
considering log /home/nginx/xxx.com_access.log
Creating new state
  Now: 2024-06-29 22:42
  Last rotated at 2024-06-29 22:00
  log does not need rotating (log has been already rotated)
considering log /home/nginx/xxx.com_error.log
Creating new state
  Now: 2024-06-29 22:42
  Last rotated at 2024-06-29 22:00
  log does not need rotating (log has been already rotated)
considering log /home/nginx/var/log/nginx/error.log
Creating new state
  Now: 2024-06-29 22:42
  Last rotated at 2024-06-29 22:00
  log does not need rotating (log has been already rotated)
not running postrotate script, since no logs were rotated

# root @ Ubuntu in /home/nginx/var/log/nginx [22:42:25]
没有报错即可
7.3 手动触发一次日志轮换以确保一切运行正常
sudo logrotate -f /etc/logrotate.d/nginx执行后发现旧日志后面多了个.1就是正常运行
# root @ Ubuntu in /home/nginx/var/log/nginx [22:45:39]
$ sudo logrotate -f /etc/logrotate.d/nginx

# root @ Ubuntu in /home/nginx/var/log/nginx [22:45:41]
$ ll
total 556K
-rw-r--r-- 1 systemd-resolve root    0 Jun 29 21:45 access.log
-rw-r----- 1 systemd-resolve adm     0 Jun 29 22:45 xxx-1.com_access.log
-rw-r--r-- 1 root            root 265K Jun 29 22:45 xxx-1.com_access.log.1
-rw-r--r-- 1 systemd-resolve root    0 Jun 29 21:56 xxx-1.com_error.log
-rw-r----- 1 systemd-resolve adm     0 Jun 29 22:45 xxx-2.com_access.log
-rw-r--r-- 1 root            root 6.6K Jun 29 22:34 xxx-2.com_access.log.1
-rw-r--r-- 1 systemd-resolve root    0 Jun 29 22:22 xxx-2.com_error.log
-rw-r----- 1 systemd-resolve adm     0 Jun 29 22:45 xxx-3.com_access.log
-rw-r--r-- 1 root            root 259K Jun 29 22:31 xxx-3.com_access.log.1
-rw-r--r-- 1 systemd-resolve root    0 Jun 29 22:26 xxx-3.com_error.log
-rw-r----- 1 systemd-resolve adm    61 Jun 29 22:45 error.log
-rw-r--r-- 1 root            root  11K Jun 29 22:45 error.log.1
从此以后,这个路径下的日志便会定期自动轮换
8.防止ip:80或者 ip:443访问
如果是上文的8880和8443就对应替换一下
为什么要禁止?
因为我发现通过http://ip:80或者https://ip:443会随机访问到config.d中配置过的网站的错误界面
8.1 创建并编辑default.conf
vim /home/nginx/etc/nginx/conf.d/default.conf粘贴进去
server {
    listen 80 default_server;
    listen [::]:80 default_server;

    server_name _;

    location / {
        return 444;
    }
}

server {
    listen 443 ssl default_server;
    listen [::]:443 ssl default_server;

    server_name _;

    ssl_certificate /home/nginx/config/do.not.even.try/cert.pem;
    ssl_certificate_key /home/nginx/config/do.not.even.try/key.pem;

    return 444;
}:wq保存退出
8.2 生成自签名ssl证书
openssl req -x509 -nodes -newkey rsa:4096 -keyout /home/nginx/config/do.not.even.try/key.pem -out /home/nginx/config/do.not.even.try/cert.pem -days 36500 -subj "/CN=do.not.even.try"说明:生成一个域名为do.not.even.try,有效期为100年的自签名证书8.3 测试并应用配置文件
测试:
docker exec -it nginx nginx -t$ docker exec -it nginx nginx -t
nginx: the configuration file /etc/nginx/nginx.conf syntax is ok
nginx: configuration file /etc/nginx/nginx.conf test is successful应用:
docker exec -it nginx nginx -s reload现在就只能通过域名来访问了
9.自动更新指定仓库中的镜像到自己的registry
目前用regsync只能同步所有镜像(或者同步指定版本号的镜像),所以说,如果有某个10年都不断更新的仓库,你想同步过来的话话,比较酸爽,,
要是你知道有什么更好的办法,求求了!告诉我!
9.1 在以下仓库中找到自己系统对应的版本的regsync-linux-amd64,下载
(也可以用docker,这里就不用了)
https://github.com/regclient/regclient/releases比如我就要下载:
wget https://github.com/regclient/regclient/releases/download/v0.6.1/regsync-linux-amd649.2 给权限
/usr/local/bin/regsync9.3 移动
mv regsync-linux-amd64 /usr/local/bin/regsync9.4 查看是否成功
regsync version返回版本号即可
$ regsync version
VCSTag:     v0.6.1
VCSRef:     766ee6291f882778207ff42207f9ca8b1da54e57
VCSCommit:  766ee6291f882778207ff42207f9ca8b1da54e57
VCSState:   clean
VCSDate:    2024-05-14T13:18:19Z
Platform:   linux/amd64
GoVer:      go1.22.3
GoCompiler: gc
9.5 编辑regsync配置文件
创建工作目录
mkdir -p /home/regsync创建配置文件
vim /home/regsync/regsync-config.yaml粘贴进来:
有两种配置文件,
第一种是全部镜像都同步过来:
version: 1
defaults:
  ratelimit:
    min: 20
    retry: 3s
  parallel: 1
creds:
  - registry: xxx.com:8443
    user: your_username
    pass: your_pwd
sync:
  - source: docker.io/nginx
    target: xxx.com:8443/nginx
    type: repository
    interval: 3h
  - source: docker.io/registry
    target: xxx.com:8443/registry
    type: repository
    interval: 3h
  - source: docker.io/regclient/regsync
    target: xxx.com:8443/regclient/regsync
    type: repository
    interval: 3h
第二种是只同步指定版本号的镜像(空间有限的话还是选这种吧):
version: 1
defaults:
  ratelimit:
    min: 20
    retry: 3s
  parallel: 1
creds:
  - registry: xxx.com:8443
    user: your_username
    pass: your_pwd
sync:
  - source: docker.io/nginx
    target: xxx.com:8443/nginx
    type: repository
    interval: 3h
    tags:
      allow:
      - "latest"
      - "edge"
      - "3"
      - "3.\\d+"
      deny:
      - "3.0"
  - source: docker.io/registry
    target: xxx.com:8443/registry
    type: repository
    interval: 3h
    tags:
      allow:
      - "latest"
      - "edge"
      - "3"
      - "3.\\d+"
      deny:
      - "3.0"
  - source: docker.io/regclient/regsync
    target: xxx.com:8443/regclient/regsync
    type: repository
    interval: 3h
    tags:
      allow:
      - "latest"
      - "edge"
      - "3"
      - "3.\\d+"
      deny:
      - "3.0"
补充:如果镜像太多,推荐使用多个docker hub账号
然后使用下面的regsync.py这个脚本,检测到账号配额用完的时候,自动切换到下一个账号
脚本中有3个地方需要手动修改,搜索
# 需要手动修改就能看到这三个位置import subprocess import signal import time import os import re import logging import threading # 定义多个DockerHub账号源 # 需要手动修改 creds_list = { "account1": "password1", "account2": "password2", "account3": "password3", "account4": "password4", "account5": "password5", "account6": "password6", "account7": "password7", "account8": "password8", "account9": "password9", "account10": "password10", "account11": "password11", "account12": "password12", "account13": "password13" } # 定义目标registry # 需要手动修改 fixed_registry = "registry.xxx.com" fixed_user = "admin" fixed_pass = "password" # 定义需要同步的镜像 # 需要手动修改 sync_parts = [ """ - source: library/redis target: registry.xxx.com/library/redis type: repository interval: 3h """, """ - source: python target: registry.xxx.com/library/python type: repository interval: 3h """, """ - source: library/mariadb target: registry.xxx.com/library/mariadb type: repository interval: 3h """, """ - source: observabilitystack/geoip-api target: registry.xxx.com/observabilitystack/geoip-api type: repository interval: 3h tags: allow: - "latest" - "latest-native" """ ] # 配置日志记录器 logging.basicConfig( filename='/home/regsync/regsync_loop.log', level=logging.INFO, format='%(asctime)s - %(levelname)s - %(message)s' ) # 锁文件路径 LOCK_FILE = '/tmp/regsync_lock.lock' def create_config(user, password, sync_content): # 提取同步镜像的名称 matches = re.findall(r'source:\s*(\S+)', sync_content) sources = ', '.join(matches) config_content = f"""\ version: 1 defaults: ratelimit: min: 2 retry: 3m parallel: 4 creds: - registry: {fixed_registry} user: {fixed_user} pass: {fixed_pass} - registry: docker.io user: {user} pass: {password} sync: {sync_content} """ with open('temp_config.yaml', 'w') as file: file.write(config_content) return sources def cleanup(signum, frame): global current_pid log_message = "检测到终止信号, 停止当前命令..." logging.info(log_message) if current_pid: try: # 终止进程组 os.killpg(os.getpgid(current_pid), signal.SIGTERM) # 等待进程结束, 设置超时时间为30秒 timeout = 30 start_time = time.time() while True: try: os.killpg(os.getpgid(current_pid), 0) # 检查进程组是否仍在运行 except ProcessLookupError: break # 进程组已经结束 if time.time() - start_time > timeout: # 超过超时时间, 强制终止进程组 os.killpg(os.getpgid(current_pid), signal.SIGKILL) break time.sleep(0.5) # 每隔0.5秒检查一次 except ProcessLookupError: pass # 删除锁文件 if os.path.exists(LOCK_FILE): os.remove(LOCK_FILE) exit(0) def check_rate_limit(user, password): token_cmd = f"curl --user '{user}:{password}' 'https://auth.docker.io/token?service=registry.docker.io&scope=repository:ratelimitpreview/test:pull' | jq -r .token" token_result = subprocess.run(token_cmd, shell=True, capture_output=True, text=True) token = token_result.stdout.strip() if token: rate_limit_cmd = f"curl --head -H 'Authorization: Bearer {token}' https://registry-1.docker.io/v2/ratelimitpreview/test/manifests/latest" rate_limit_result = subprocess.run(rate_limit_cmd, shell=True, capture_output=True, text=True) headers = rate_limit_result.stdout rate_limit_remaining = re.search(r'ratelimit-remaining:\s*(\d+)', headers) rate_limit_limit = re.search(r'ratelimit-limit:\s*(\d+)', headers) if rate_limit_remaining and rate_limit_limit: remaining = int(rate_limit_remaining.group(1)) limit = int(rate_limit_limit.group(1)) log_message = f"账号 {user} 的当前配额: {remaining}/{limit}" logging.info(log_message) return remaining, limit return None, None def rate_limit_monitor(current_creds, creds_lock): while True: with creds_lock: user, password = current_creds[0], current_creds[1] check_rate_limit(user, password) time.sleep(300) # 每5分钟检测一次 def switch_account(counter, commands, current_creds, creds_lock): for _ in range(len(commands)): counter = (counter + 1) % len(commands) user, password = commands[counter].split(':') remaining, _ = check_rate_limit(user, password) if remaining is not None and remaining > 5: with creds_lock: current_creds[0] = user current_creds[1] = password return counter, user, password else: log_message = f"账号 {user} 的剩余配额不足,跳过该账号" logging.info(log_message) log_message = "所有账号剩余配额均不足,等待30分钟" logging.info(log_message) time.sleep(1800) return switch_account(counter, commands, current_creds, creds_lock) def time_formatter(elapsed_time): seconds_in_minute = 60 seconds_in_hour = 60 * seconds_in_minute seconds_in_day = 24 * seconds_in_hour seconds_in_month = 30 * seconds_in_day seconds_in_year = 12 * seconds_in_month years, remainder = divmod(elapsed_time, seconds_in_year) months, remainder = divmod(remainder, seconds_in_month) days, remainder = divmod(remainder, seconds_in_day) hours, remainder = divmod(remainder, seconds_in_hour) minutes, seconds = divmod(remainder, seconds_in_minute) time_components = [] if years > 0: time_components.append(f"{int(years)}年") if months > 0: time_components.append(f"{int(months)}月") if days > 0: time_components.append(f"{int(days)}天") if hours > 0: time_components.append(f"{int(hours)}小时") if minutes > 0: time_components.append(f"{int(minutes)}分") if seconds > 0 or not time_components: # 显示秒数时去掉小数部分 time_components.append(f"{int(seconds)}秒" if seconds.is_integer() else f"{seconds:.2f}秒") return ''.join(time_components) def main(): global current_pid # 设置信号处理 signal.signal(signal.SIGINT, cleanup) signal.signal(signal.SIGTERM, cleanup) # 检查并创建锁文件 if os.path.exists(LOCK_FILE): logging.info("检测到锁文件,脚本已经在运行中,取消本次运行。") exit(1) # 创建锁文件 open(LOCK_FILE, 'w').close() # 定义日志文件路径 command_log_file = "/home/regsync/regsync_command.log" keyword = "Delaying for rate limit" completion_keyword = "PROCESS_COMPLETED" commands = [f"{user}:{password}" for user, password in creds_list.items()] total_sync_parts = len(sync_parts) counter = 0 sync_part_index = 0 current_pid = None current_creds = [commands[counter].split(':')[0], commands[counter].split(':')[1]] creds_lock = threading.Lock() # 启动配额检查线程 threading.Thread(target=rate_limit_monitor, args=(current_creds, creds_lock), daemon=True).start() start_time_total = time.time() # 总时间计时开始 while sync_part_index < total_sync_parts: # 生成配置文件并提取同步镜像的名称 sync_content = sync_parts[sync_part_index] sources = create_config(current_creds[0], current_creds[1], sync_content) start_time_single = time.time() # 单个镜像时间计时开始 # 运行当前命令 with open(command_log_file, 'a') as cmd_log: process = subprocess.Popen( ['sh', '-c', 'regsync once -c temp_config.yaml -v debug; echo PROCESS_COMPLETED'], stdout=cmd_log, stderr=cmd_log, preexec_fn=os.setsid # 启动新进程组 ) current_pid = process.pid log_message = f"开始同步第 {sync_part_index + 1}/{total_sync_parts} 个镜像: {sources}, 使用账号: {current_creds[0]}, pid={current_pid}" logging.info(log_message) # 检查日志文件中是否包含关键词或处理完成关键词 while True: cmd_log.flush() cmd_log.seek(0) with open(command_log_file, 'r') as log_file_obj: output = log_file_obj.read() if keyword in output: log_message = f"检测到ratelimit关键词 {keyword}, 停止当前命令并切换到下一个账号" logging.info(log_message) # 终止整个进程组 os.killpg(os.getpgid(current_pid), signal.SIGTERM) current_pid = None # 清空日志文件 with open(command_log_file, 'w') as log_file_obj: log_file_obj.write('') counter, current_creds[0], current_creds[1] = switch_account(counter, commands, current_creds, creds_lock) # 切换到下一个账号 break elif completion_keyword in output: log_message = f"检测到处理完成关键词 {completion_keyword}, 停止当前命令并切换到下一个镜像" logging.info(log_message) # 终止整个进程组 os.killpg(os.getpgid(current_pid), signal.SIGTERM) current_pid = None sync_part_index += 1 # 切换到下一个镜像 # 清空日志文件 with open(command_log_file, 'w') as log_file_obj: log_file_obj.write('') # 记录单个镜像的时间 elapsed_time_single = time.time() - start_time_single elapsed_time_total = time.time() - start_time_total log_message = f"镜像 {sources} 同步完成,本次耗时: {time_formatter(elapsed_time_single)},总耗时: {time_formatter(elapsed_time_total)}" logging.info(log_message) # 更新同步进度 log_message = f"同步已完成: {sync_part_index}/{total_sync_parts}" logging.info(log_message) # 删除临时配置文件 os.remove('temp_config.yaml') break log_message = f"同步 {sources} 中,请稍候..." logging.info(log_message) time.sleep(60) time.sleep(60) # 记录总时间 elapsed_time_total = time.time() - start_time_total log_message = f"所有镜像同步完成,总耗时: {time_formatter(elapsed_time_total)}" logging.info(log_message) # 删除锁文件 if (os.path.exists(LOCK_FILE)): os.remove(LOCK_FILE) if __name__ == '__main__': main()
9.6 试运行同步镜像
regsync once -c /home/regsync/regsync-config.yaml -v info >> /home/regsync/regsync.log 2>&1要是镜像很多的话,用nohup或者screen后台运行吧
通过如下命令查看日志
tail -F -n 1000 /home/regsync/regsync.log测试一会儿,大致没问题的话就可以^C停止测试了
9.7 自动同步镜像
设置开机自动运行
crontab -e在最后一行后面粘贴如下内容
@reboot /usr/local/bin/regsync server -c /home/regsync/regsync-config.yaml -v info >> /var/log/regsync.log 2>&1重启后使用ps aux | grep regsync查看是否正常运行
没问题的话可以加个延迟启动:
@reboot sleep 600 && /usr/local/bin/regsync server -c /home/regsync/regsync-config.yaml -v info >> /var/log/regsync.log 2>&110.客户端的设置
客户端需要将当前镜像添到daemon.json才行
10.1 编辑daemon.json
vim /etc/docker/daemon.json{
"registry-mirrors": [
"https://docker.m.daocloud.io"
]
}:wq保存退出
10.2 重启docker
systemctl restart docker注意这条命令会重启已有容器
10.3 查看镜像源是否添加成功
docker info看最后几行,有就行
11.结语
按道理说,应该还有种use registry as pull through cache的模式
这种模式不用同步整个镜像仓库,一开始你本地这边是空的,然后服务端接收到客户端的pull命令以后,会现在本地查找收否有对应镜像,
有的话要判断本地镜像是不是最新的,
如果本地不是最新的或者本地没有的话
就会从你配置的config.yml的remoteurl
或者从你配置的docker-compose.yml的REGISTRY_PROXY_REMOTEURL
中读取镜像源,从镜像源里面先下载客户端请求的镜像到服务端的/var/lib/registry中,然后再推送给请求的客户端
但是这种方法我试了很久,死活不成功
法二、harbor
0.前置条件
安装好docker,docker-compose
1.初始化目录
1.1 创建harbor目录
mkdir /home/harbor1.2 官方仓库下载离线安装包
cd /home/harbor
https://github.com/goharbor/harbor/releases/download/v2.11.0/harbor-offline-installer-v2.11.0.tgz
不用区分架构是arm还是amd,都是下这个,一样的
1.3 解压
tar -zxvf harbor-offline-installer-v2.11.0.tgz1.4 执行就是了
mv harbor/* ./
rm -r harbor harbor-offline-installer-v2.11.0.tgz
按照上面的流程下来以后,目录应该长这样:
# root @ mx in /home/harbor
$ tree .
.
├── common.sh
├── harbor.v2.11.0.tar.gz
├── harbor.yml
├── harbor.yml.tmpl
├── install.sh
├── LICENSE
└── prepare

0 directories, 7 files

# root @ mx in /home/harbor
2.获取ssl证书(可选,推荐)
2.1 获取方式
你有自己的办法也可以,最终的效果就是要有fullchain.pem和privkey.pem
不会的话可以参考法一中的1、3、4、6:
1.docker安装nginxx
3.杂项
4.解析域名xxx.com到当前主机ip
6.获取ssl证书
以下文章使用的ssl证书路径也是根据法一中的来设置的
2.2 ssl自动更新
自动更新也要配合法一中的脚本
这里的域名需要修改为xxx.com
update_certs.sh
#!/bin/bash

# 复制并重命名文件
cp /home/nginx/certs/xxx.com/fullchain.pem /home/harbor/data/secret/cert/server.crt
cp /home/nginx/certs/xxx.com/privkey.pem /home/harbor/data/secret/cert/server.key

# 更改文件权限
chmod 600 /home/harbor/data/secret/cert/server.crt
chmod 600 /home/harbor/data/secret/cert/server.key

# 更改文件所有者
chown 10000:10000 /home/harbor/data/secret/cert/server.crt
chown 10000:10000 /home/harbor/data/secret/cert/server.key
添加到crontab每天来一次
更新:下面这个方法我发现一个弊端
三个月证书到期以后,如果harbor容器没重启的话,还是没用,必须重启一下,harbor才会读取新复制过去的证书
所以crontab应该在每次更新证书以后重启harbor,这样设置:
# 每天凌晨3:30给harbor更新一下证书
30 3 * * * /usr/bin/bash /home/harbor/update_certs.sh && docker-compose -f /home/harbor/docker-compose.yml down && docker-compose -f /home/harbor/docker-compose.yml up -d
3.安装harbor
3.1 编辑配置文件
3.1.1 复制template配置文件
cp harbor.yml.tmpl harbor.yml3.1.2 编辑harbor.yml
vim harbor.yml一般来说,只修改配置文件中没有注释掉的即可
例子:
修改其中的第5行、第10行、第15行、第17行、第18行、第47行、第52行、第66行、第165行就够了
其中17行、18行的证书就是2.获取ssl证书(可选,推荐)获取的,注意,必须用fullchain.pem,不能用cert.pem,不然push镜像会报错
第66行和第165行最好按照我这个来改,默认的路径乱七八糟的,东一块西一块
# Configuration file of Harbor

# The IP address or hostname to access admin UI and registry service.
# DO NOT use localhost or 127.0.0.1, because Harbor needs to be accessed by external clients.
hostname: xxx.com

# http related config
http:
  # port for http, default is 80. If https enabled, this port will redirect to https port
  port: 22280

# https related config
https:
  # https port for harbor, default is 443
  port: 22443
  # The path of cert and key files for nginx
  certificate: /home/nginx/certs/xxx.com/fullchain.pem
  private_key: /home/nginx/certs/xxx.com/privkey.pem
  # enable strong ssl ciphers (default: false)
  # strong_ssl_ciphers: false

# # Harbor will set ipv4 enabled only by default if this block is not configured
# # Otherwise, please uncomment this block to configure your own ip_family stacks
# ip_family:
#   # ipv6Enabled set to true if ipv6 is enabled in docker network, currently it affected the nginx related component
#   ipv6:
#     enabled: false
#   # ipv4Enabled set to true by default, currently it affected the nginx related component
#   ipv4:
#     enabled: true

# # Uncomment following will enable tls communication between all harbor components
# internal_tls:
#   # set enabled to true means internal tls is enabled
#   enabled: true
#   # put your cert and key files on dir
#   dir: /etc/harbor/tls/internal


# Uncomment external_url if you want to enable external proxy
# And when it enabled the hostname will no longer used
# external_url: https://reg.mydomain.com:8433

# The initial password of Harbor admin
# It only works in first time to install harbor
# Remember Change the admin password from UI after launching Harbor.
harbor_admin_password: changeme

# Harbor DB configuration
database:
  # The password for the root user of Harbor DB. Change this before any production use.
  password: changeme
  # The maximum number of connections in the idle connection pool. If it <=0, no idle connections are retained.
  max_idle_conns: 100
  # The maximum number of open connections to the database. If it <= 0, then there is no limit on the number of open connections.
  # Note: the default number of connections is 1024 for postgres of harbor.
  max_open_conns: 900
  # The maximum amount of time a connection may be reused. Expired connections may be closed lazily before reuse. If it <= 0, connections are not closed due to a connection's age.
  # The value is a duration string. A duration string is a possibly signed sequence of decimal numbers, each with optional fraction and a unit suffix, such as "300ms", "-1.5h" or "2h45m". Valid time units are "ns", "us" (or "µs"), "ms", "s", "m", "h".
  conn_max_lifetime: 5m
  # The maximum amount of time a connection may be idle. Expired connections may be closed lazily before reuse. If it <= 0, connections are not closed due to a connection's idle time.
  # The value is a duration string. A duration string is a possibly signed sequence of decimal numbers, each with optional fraction and a unit suffix, such as "300ms", "-1.5h" or "2h45m". Valid time units are "ns", "us" (or "µs"), "ms", "s", "m", "h".
  conn_max_idle_time: 0

# The default data volume
data_volume: /home/harbor/data

# Harbor Storage settings by default is using /data dir on local filesystem
# Uncomment storage_service setting If you want to using external storage
# storage_service:
#   # ca_bundle is the path to the custom root ca certificate, which will be injected into the truststore
#   # of registry's containers.  This is usually needed when the user hosts a internal storage with self signed certificate.
#   ca_bundle:

#   # storage backend, default is filesystem, options include filesystem, azure, gcs, s3, swift and oss
#   # for more info about this configuration please refer https://distribution.github.io/distribution/about/configuration/
#   # and https://distribution.github.io/distribution/storage-drivers/
#   filesystem:
#     maxthreads: 100
#   # set disable to true when you want to disable registry redirect
#   redirect:
#     disable: false

# Trivy configuration
#
# Trivy DB contains vulnerability information from NVD, Red Hat, and many other upstream vulnerability databases.
# It is downloaded by Trivy from the GitHub release page https://github.com/aquasecurity/trivy-db/releases and cached
# in the local file system. In addition, the database contains the update timestamp so Trivy can detect whether it
# should download a newer version from the Internet or use the cached one. Currently, the database is updated every
# 12 hours and published as a new release to GitHub.
trivy:
  # ignoreUnfixed The flag to display only fixed vulnerabilities
  ignore_unfixed: false
  # skipUpdate The flag to enable or disable Trivy DB downloads from GitHub
  #
  # You might want to enable this flag in test or CI/CD environments to avoid GitHub rate limiting issues.
  # If the flag is enabled you have to download the `trivy-offline.tar.gz` archive manually, extract `trivy.db` and
  # `metadata.json` files and mount them in the `/home/scanner/.cache/trivy/db` path.
  skip_update: false
  #
  # skipJavaDBUpdate If the flag is enabled you have to manually download the `trivy-java.db` file and mount it in the
  # `/home/scanner/.cache/trivy/java-db/trivy-java.db` path
  skip_java_db_update: false
  #
  # The offline_scan option prevents Trivy from sending API requests to identify dependencies.
  # Scanning JAR files and pom.xml may require Internet access for better detection, but this option tries to avoid it.
  # For example, the offline mode will not try to resolve transitive dependencies in pom.xml when the dependency doesn't
  # exist in the local repositories. It means a number of detected vulnerabilities might be fewer in offline mode.
  # It would work if all the dependencies are in local.
  # This option doesn't affect DB download. You need to specify "skip-update" as well as "offline-scan" in an air-gapped environment.
  offline_scan: false
  #
  # Comma-separated list of what security issues to detect. Possible values are `vuln`, `config` and `secret`. Defaults to `vuln`.
  security_check: vuln
  #
  # insecure The flag to skip verifying registry certificate
  insecure: false
  #
  # timeout The duration to wait for scan completion.
  # There is upper bound of 30 minutes defined in scan job. So if this `timeout` is larger than 30m0s, it will also timeout at 30m0s.
  timeout: 5m0s
  #
  # github_token The GitHub access token to download Trivy DB
  #
  # Anonymous downloads from GitHub are subject to the limit of 60 requests per hour. Normally such rate limit is enough
  # for production operations. If, for any reason, it's not enough, you could increase the rate limit to 5000
  # requests per hour by specifying the GitHub access token. For more details on GitHub rate limiting please consult
  # https://docs.github.com/rest/overview/resources-in-the-rest-api#rate-limiting
  #
  # You can create a GitHub token by following the instructions in
  # https://help.github.com/en/github/authenticating-to-github/creating-a-personal-access-token-for-the-command-line
  #
  # github_token: xxx

jobservice:
  # Maximum number of job workers in job service
  max_job_workers: 10
  # The jobLoggers backend name, only support "STD_OUTPUT", "FILE" and/or "DB"
  job_loggers:
    - STD_OUTPUT
    - FILE
    # - DB
  # The jobLogger sweeper duration (ignored if `jobLogger` is `stdout`)
  logger_sweeper_duration: 1 #days

notification:
  # Maximum retry count for webhook job
  webhook_job_max_retry: 3
  # HTTP client timeout for webhook job
  webhook_job_http_client_timeout: 3 #seconds

# Log configurations
log:
  # options are debug, info, warning, error, fatal
  level: info
  # configs for logs in local storage
  local:
    # Log files are rotated log_rotate_count times before being removed. If count is 0, old versions are removed rather than rotated.
    rotate_count: 50
    # Log files are rotated only if they grow bigger than log_rotate_size bytes. If size is followed by k, the size is assumed to be in kilobytes.
    # If the M is used, the size is in megabytes, and if G is used, the size is in gigabytes. So size 100, size 100k, size 100M and size 100G
    # are all valid.
    rotate_size: 200M
    # The directory on your host that store log
    location: /home/harbor/var/log/harbor

  # Uncomment following lines to enable external syslog endpoint.
  # external_endpoint:
  #   # protocol used to transmit log to external endpoint, options is tcp or udp
  #   protocol: tcp
  #   # The host of external endpoint
  #   host: localhost
  #   # Port of external endpoint
  #   port: 5140

#This attribute is for migrator to detect the version of the .cfg file, DO NOT MODIFY!
_version: 2.11.0

# Uncomment external_database if using external database.
# external_database:
#   harbor:
#     host: harbor_db_host
#     port: harbor_db_port
#     db_name: harbor_db_name
#     username: harbor_db_username
#     password: harbor_db_password
#     ssl_mode: disable
#     max_idle_conns: 2
#     max_open_conns: 0

# Uncomment redis if need to customize redis db
# redis:
#   # db_index 0 is for core, it's unchangeable
#   # registry_db_index: 1
#   # jobservice_db_index: 2
#   # trivy_db_index: 5
#   # it's optional, the db for harbor business misc, by default is 0, uncomment it if you want to change it.
#   # harbor_db_index: 6
#   # it's optional, the db for harbor cache layer, by default is 0, uncomment it if you want to change it.
#   # cache_layer_db_index: 7

# Uncomment external_redis if using external Redis server
# external_redis:
#   # support redis, redis+sentinel
#   # host for redis: <host_redis>:<port_redis>
#   # host for redis+sentinel:
#   #  <host_sentinel1>:<port_sentinel1>,<host_sentinel2>:<port_sentinel2>,<host_sentinel3>:<port_sentinel3>
#   host: redis:6379
#   password:
#   # Redis AUTH command was extended in Redis 6, it is possible to use it in the two-arguments AUTH <username> <password> form.
#   # there's a known issue when using external redis username ref:https://github.com/goharbor/harbor/issues/18892
#   # if you care about the image pull/push performance, please refer to this https://github.com/goharbor/harbor/wiki/Harbor-FAQs#external-redis-username-password-usage
#   # username:
#   # sentinel_master_set must be set to support redis+sentinel
#   #sentinel_master_set:
#   # db_index 0 is for core, it's unchangeable
#   registry_db_index: 1
#   jobservice_db_index: 2
#   trivy_db_index: 5
#   idle_timeout_seconds: 30
#   # it's optional, the db for harbor business misc, by default is 0, uncomment it if you want to change it.
#   # harbor_db_index: 6
#   # it's optional, the db for harbor cache layer, by default is 0, uncomment it if you want to change it.
#   # cache_layer_db_index: 7

# Uncomment uaa for trusting the certificate of uaa instance that is hosted via self-signed cert.
# uaa:
#   ca_file: /path/to/ca

# Global proxy
# Config http proxy for components, e.g. http://my.proxy.com:3128
# Components doesn't need to connect to each others via http proxy.
# Remove component from `components` array if want disable proxy
# for it. If you want use proxy for replication, MUST enable proxy
# for core and jobservice, and set `http_proxy` and `https_proxy`.
# Add domain to the `no_proxy` field, when you want disable proxy
# for some special registry.
proxy:
  http_proxy:
  https_proxy:
  no_proxy:
  components:
    - core
    - jobservice
    - trivy

# metric:
#   enabled: false
#   port: 9090
#   path: /metrics

# Trace related config
# only can enable one trace provider(jaeger or otel) at the same time,
# and when using jaeger as provider, can only enable it with agent mode or collector mode.
# if using jaeger collector mode, uncomment endpoint and uncomment username, password if needed
# if using jaeger agetn mode uncomment agent_host and agent_port
# trace:
#   enabled: true
#   # set sample_rate to 1 if you wanna sampling 100% of trace data; set 0.5 if you wanna sampling 50% of trace data, and so forth
#   sample_rate: 1
#   # # namespace used to differentiate different harbor services
#   # namespace:
#   # # attributes is a key value dict contains user defined attributes used to initialize trace provider
#   # attributes:
#   #   application: harbor
#   # # jaeger should be 1.26 or newer.
#   # jaeger:
#   #   endpoint: http://hostname:14268/api/traces
#   #   username:
#   #   password:
#   #   agent_host: hostname
#   #   # export trace data by jaeger.thrift in compact mode
#   #   agent_port: 6831
#   # otel:
#   #   endpoint: hostname:4318
#   #   url_path: /v1/traces
#   #   compression: false
#   #   insecure: true
#   #   # timeout is in seconds
#   #   timeout: 10

# Enable purge _upload directories
upload_purging:
  enabled: true
  # remove files in _upload directories which exist for a period of time, default is one week.
  age: 168h
  # the interval of the purge operations
  interval: 24h
  dryrun: false

# Cache layer configurations
# If this feature enabled, harbor will cache the resource
# `project/project_metadata/repository/artifact/manifest` in the redis
# which can especially help to improve the performance of high concurrent
# manifest pulling.
# NOTICE
# If you are deploying Harbor in HA mode, make sure that all the harbor
# instances have the same behaviour, all with caching enabled or disabled,
# otherwise it can lead to potential data inconsistency.
cache:
  # not enabled by default
  enabled: false
  # keep cache for one day by default
  expire_hours: 24

# Harbor core configurations
# Uncomment to enable the following harbor core related configuration items.
# core:
#   # The provider for updating project quota(usage), there are 2 options, redis or db,
#   # by default is implemented by db but you can switch the updation via redis which
#   # can improve the performance of high concurrent pushing to the same project,
#   # and reduce the database connections spike and occupies.
#   # By redis will bring up some delay for quota usage updation for display, so only
#   # suggest switch provider to redis if you were ran into the db connections spike around
#   # the scenario of high concurrent pushing to same project, no improvement for other scenes.
# quota_update_provider: redis # Or db修改完成后:wq保存退出
3.1.3 运行install.sh
运行完这个脚本以后,就会自动在当前目录下生成一个docker-compise.yml
./install.sh --with-trivy
--with-trivy是一个可选项会多一个trivy容器,功能是扫描镜像漏洞
中途要是遇到什么报错就自己处理下,应该问题不大
我这里的测试机上安装还算顺利:
# root @ ubuntu in /home/harbor [19:29:42]
$ ./install.sh --with-trivy

[Step 0]: checking if docker is installed ...

Note: docker version: 24.0.7

[Step 1]: checking docker-compose is installed ...

Note: docker-compose version: 2.27.0


[Step 2]: preparing environment ...

[Step 3]: preparing harbor configs ...
prepare base dir is set to /home/harbor
Generated configuration file: /config/portal/nginx.conf
Generated configuration file: /config/log/logrotate.conf
Generated configuration file: /config/log/rsyslog_docker.conf
Generated configuration file: /config/nginx/nginx.conf
Generated configuration file: /config/core/env
Generated configuration file: /config/core/app.conf
Generated configuration file: /config/registry/config.yml
Generated configuration file: /config/registryctl/env
Generated configuration file: /config/registryctl/config.yml
Generated configuration file: /config/db/env
Generated configuration file: /config/jobservice/env
Generated configuration file: /config/jobservice/config.yml
Generated and saved secret to file: /data/secret/keys/secretkey
Successfully called func: create_root_cert
Generated configuration file: /config/trivy-adapter/env
Generated configuration file: /compose_location/docker-compose.yml
Clean up the input dir


Note: stopping existing Harbor instance ...
WARN[0000] /home/harbor/docker-compose.yml: `version` is obsolete


[Step 4]: starting Harbor ...
WARN[0000] /home/harbor/docker-compose.yml: `version` is obsolete
[+] Running 9/9
✔ Network harbor_harbor        Created                                                                                 0.1s
✔ Container harbor-log         Created                                                                                 0.2s
✔ Container harbor-portal      Created                                                                                 0.2s
✔ Container harbor-db          Created                                                                                 0.1s
✔ Container registryctl        Created                                                                                 0.1s
✔ Container redis              Created                                                                                 0.1s
✔ Container registry           Created                                                                                 0.1s
✔ Container harbor-core        Created                                                                                 0.1s
✔ Container trivy-adapter      Created                                                                                 0.1s
⠋ Container harbor-jobservice  Creating                                                                                0.0s
⠋ Container nginx              Creating                                                                                0.0s
Error response from daemon: Conflict. The container name "/nginx" is already in use by container "99e0ae8980db66a8a16af56f7c2e79dba323bb623f119886ce5e9e13e92931f6". You have to remove (or rename) that container to be able to reuse that name.

# root @ ubuntu in /home/harbor [19:30:24] C:1
$ dcdn
WARN[0000] /home/harbor/docker-compose.yml: `version` is obsolete
[+] Running 10/10
✔ Container trivy-adapter      Removed                                                                                 0.0s
✔ Container harbor-portal      Removed                                                                                 0.0s
✔ Container harbor-jobservice  Removed                                                                                 0.0s
✔ Container registryctl        Removed                                                                                 0.0s
✔ Container harbor-core        Removed                                                                                 0.0s
✔ Container harbor-db          Removed                                                                                 0.0s
✔ Container registry           Removed                                                                                 0.0s
✔ Container redis              Removed                                                                                 0.0s
✔ Container harbor-log         Removed                                                                                 0.0s
✔ Network harbor_harbor        Removed                                                                                 0.1s

# root @ ubuntu in /home/harbor [19:30:31]
$ vim docker-compose.yml

# root @ ubuntu in /home/harbor [19:30:45]
$ dcupd
WARN[0000] /home/harbor/docker-compose.yml: `version` is obsolete
[+] Running 11/11
✔ Network harbor_harbor        Created                                                                                 0.1s
✔ Container harbor-log         Started                                                                                 0.6s
✔ Container registry           Started                                                                                 1.4s
✔ Container harbor-db          Started                                                                                 1.2s
✔ Container redis              Started                                                                                 1.4s
✔ Container registryctl        Started                                                                                 1.3s
✔ Container harbor-portal      Started                                                                                 1.2s
✔ Container trivy-adapter      Started                                                                                 1.8s
✔ Container harbor-core        Started                                                                                 1.8s
✔ Container nginx-harbor       Started                                                                                 2.4s
✔ Container harbor-jobservice  Started                                                                                 2.4s

# root @ ubuntu in /home/harbor [19:30:50]
$
harbor.v2.11.0.tar.gz早就可以删除了
他这里nginx和我以前安装的nginx重复了,但是不太改动啊,他这10个容器一起运行,怕一动就会有奇怪的报错,名字重复就改个名算了
4.配置harbor
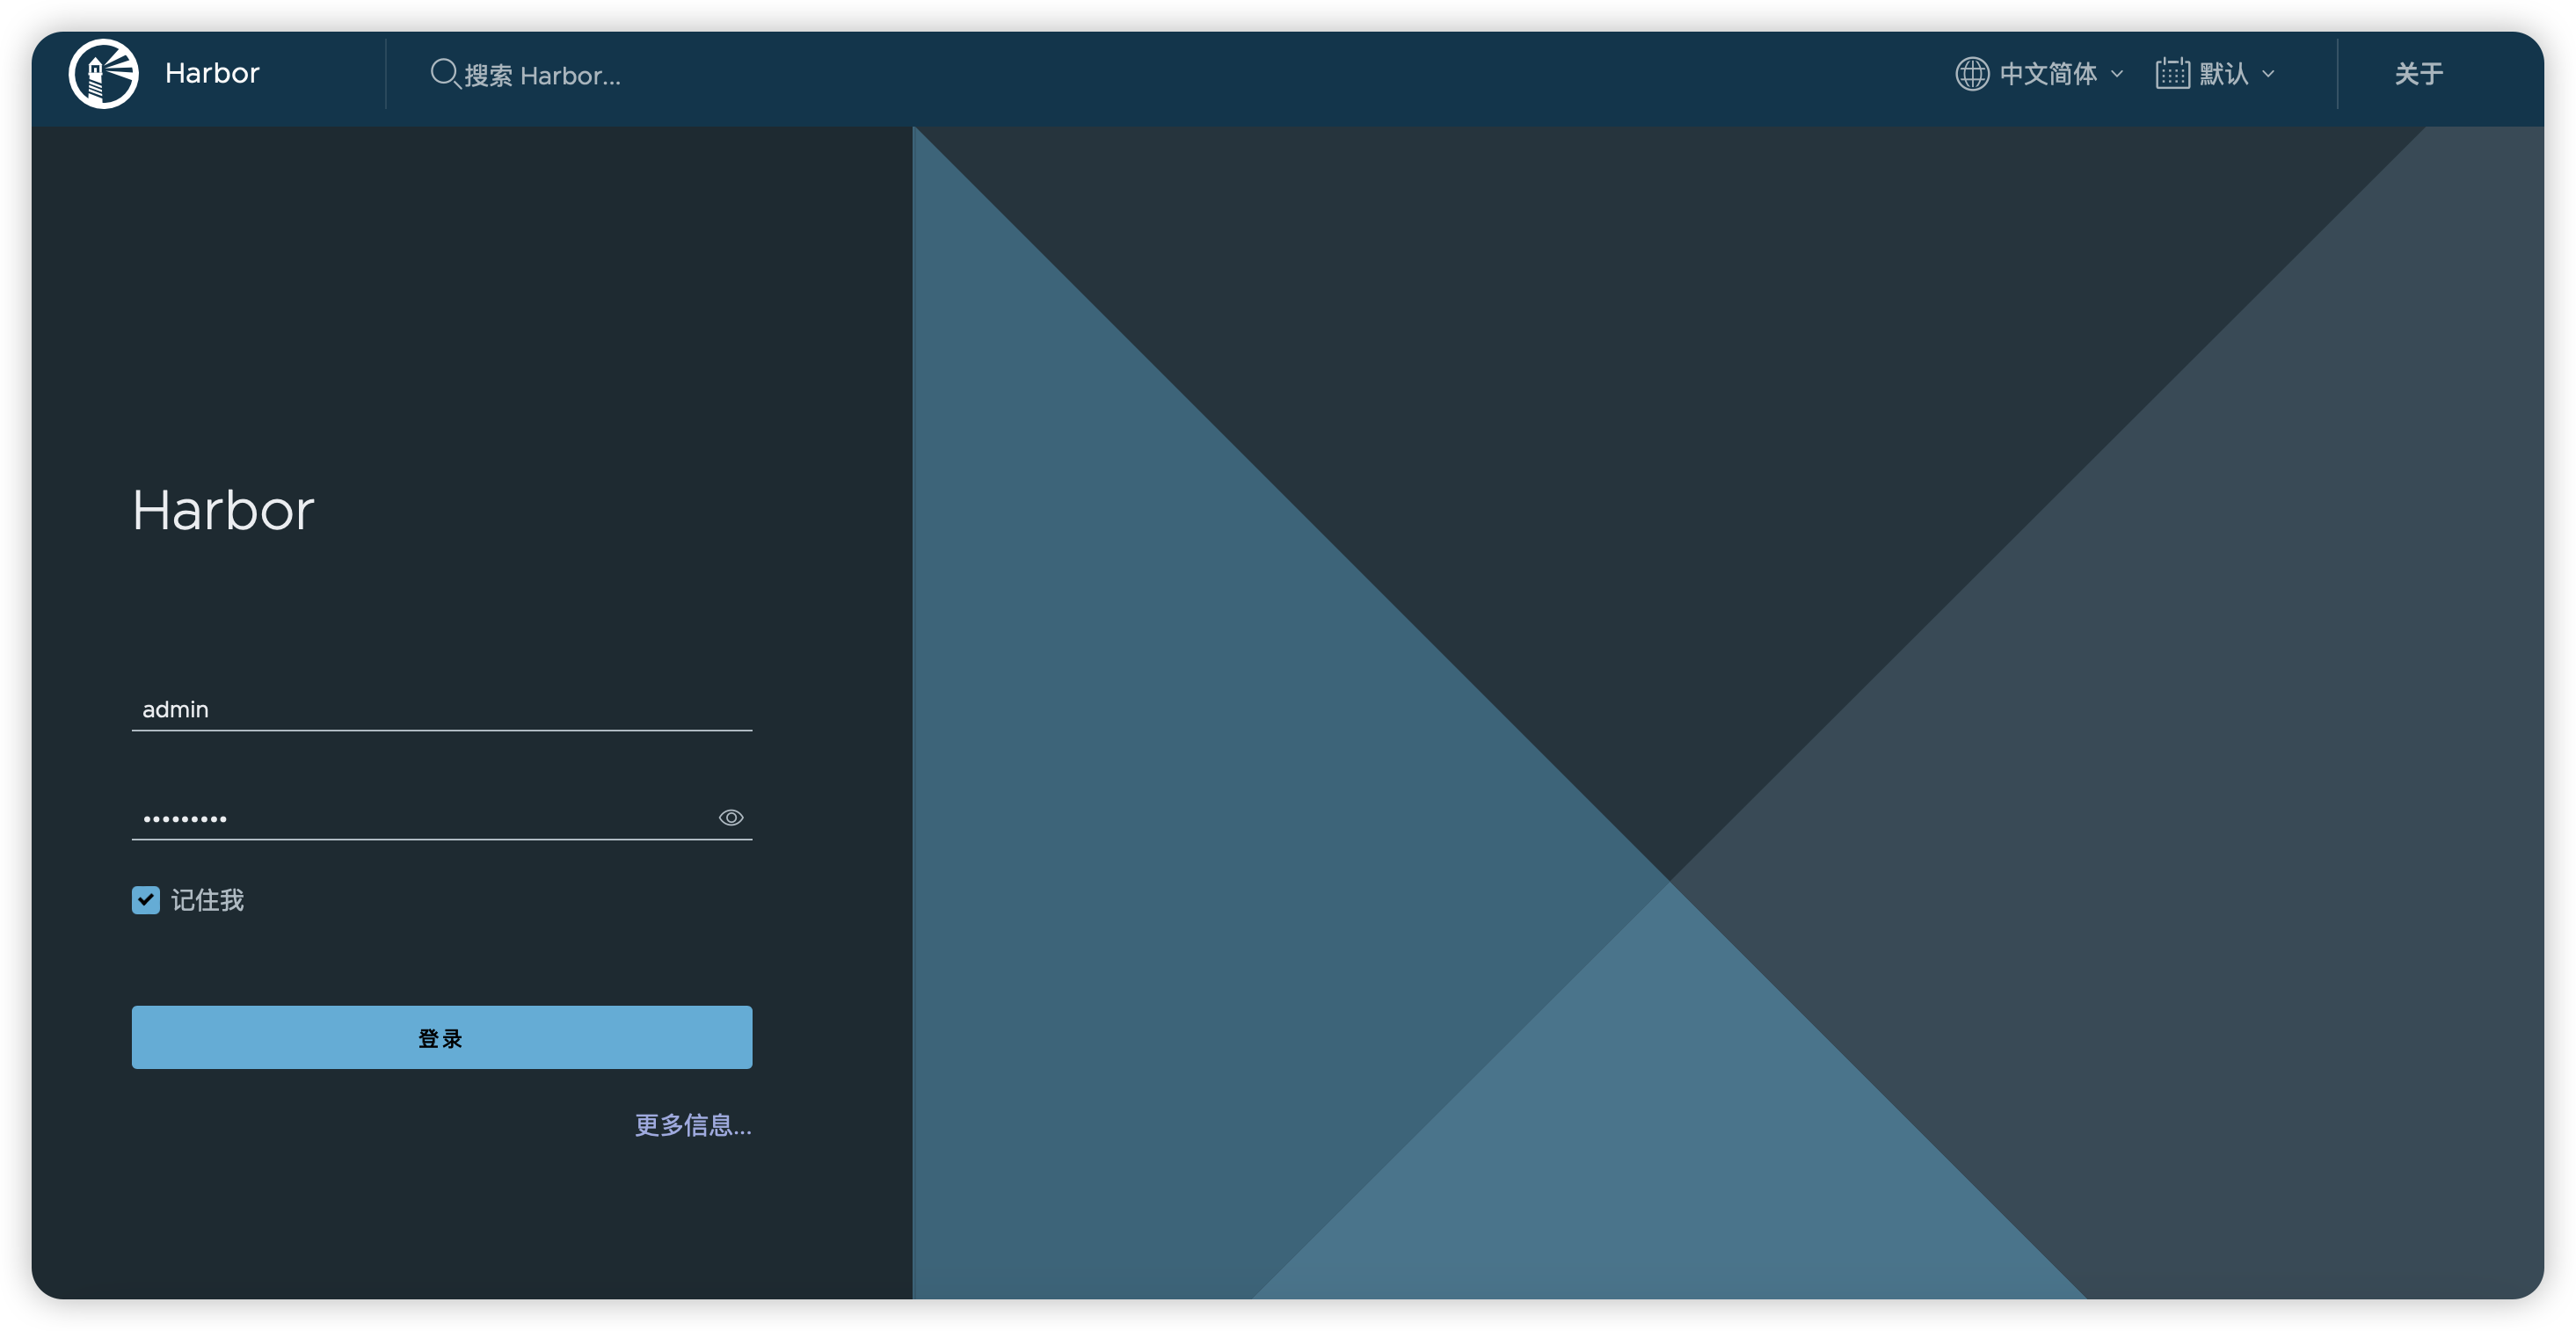
到这里就可以浏览器打开网站了
https://xxx.com:22443用户名admin
密码就是/home/harbor/harbor.yml的第47行:harbor_admin_password: xxx
这里说明一下
Harbor supports different modes for authenticating users and managing user accounts. You should select an authentication mode as soon as you deploy Harbor.
If you create user accounts in the Harbor database, Harbor is locked in database mode. You cannot change to a different authentication mode after creating local users.
一般不用管
5.挂载
如果你没有这几种存储方式
Google Cloud Storage
Microsoft Azure storage
S3 storage
并且本地的空间也不够的话,现在就是最适合挂载外部储存的时候
5.1 先停止容器
docker-compose down# root @ ubuntu in /home/harbor
$ dcdn
WARN[0000] /home/harbor/docker-compose.yml: `version` is obsolete
[+] Running 11/11
✔ Container nginx-harbor Removed 12.4s
✔ Container trivy-adapter Removed 12.3s
✔ Container registryctl Removed 12.4s
✔ Container harbor-jobservice Removed 12.4s
✔ Container harbor-core Removed 13.0s
✔ Container harbor-portal Removed 13.0s
✔ Container harbor-db Removed 12.6s
✔ Container registry Removed 12.6s
✔ Container redis Removed 12.6s
✔ Container harbor-log Removed 12.6s
✔ Network harbor_harbor Removed 0.1s
# root @ ubuntu in /home/harbor5.2 删除registry文件夹
rm -r /home/harbor/data/registry5.3 挂载外部名为registry的文件夹到/home/harbor/data/下
挂载方式多种多样,略
注意UID和GID都要挂载为10000
# root @ ubuntu in /home/harbor/data C:1
$ l
总计 32K
drwxr-xr-x 9 root    root            4.0K  6月 11 19:41 .
drwxr-xr-x 5 root    root            4.0K  6月 11 19:30 ..
drwxr-xr-x 2   10000           10000 4.0K  6月 11 19:30 ca_download
drwx------ 3 dnsmasq systemd-journal 4.0K  6月 11 19:30 database
drwxr-xr-x 2   10000           10000 4.0K  6月 11 19:30 job_logs
drwxr-xr-x 2 dnsmasq systemd-journal 4.0K  6月 11 19:30 redis
drwxr-xr-x 1   10000           10000    0  6月 11 19:39 registry
drwxr-xr-x 6 root    root            4.0K  6月 11 19:30 secret
drwxr-xr-x 4 root    root            4.0K  6月 11 19:30 trivy-adapter
5.4 启动容器
docker-compose up -d6.使用harbor
6.1 新建仓库
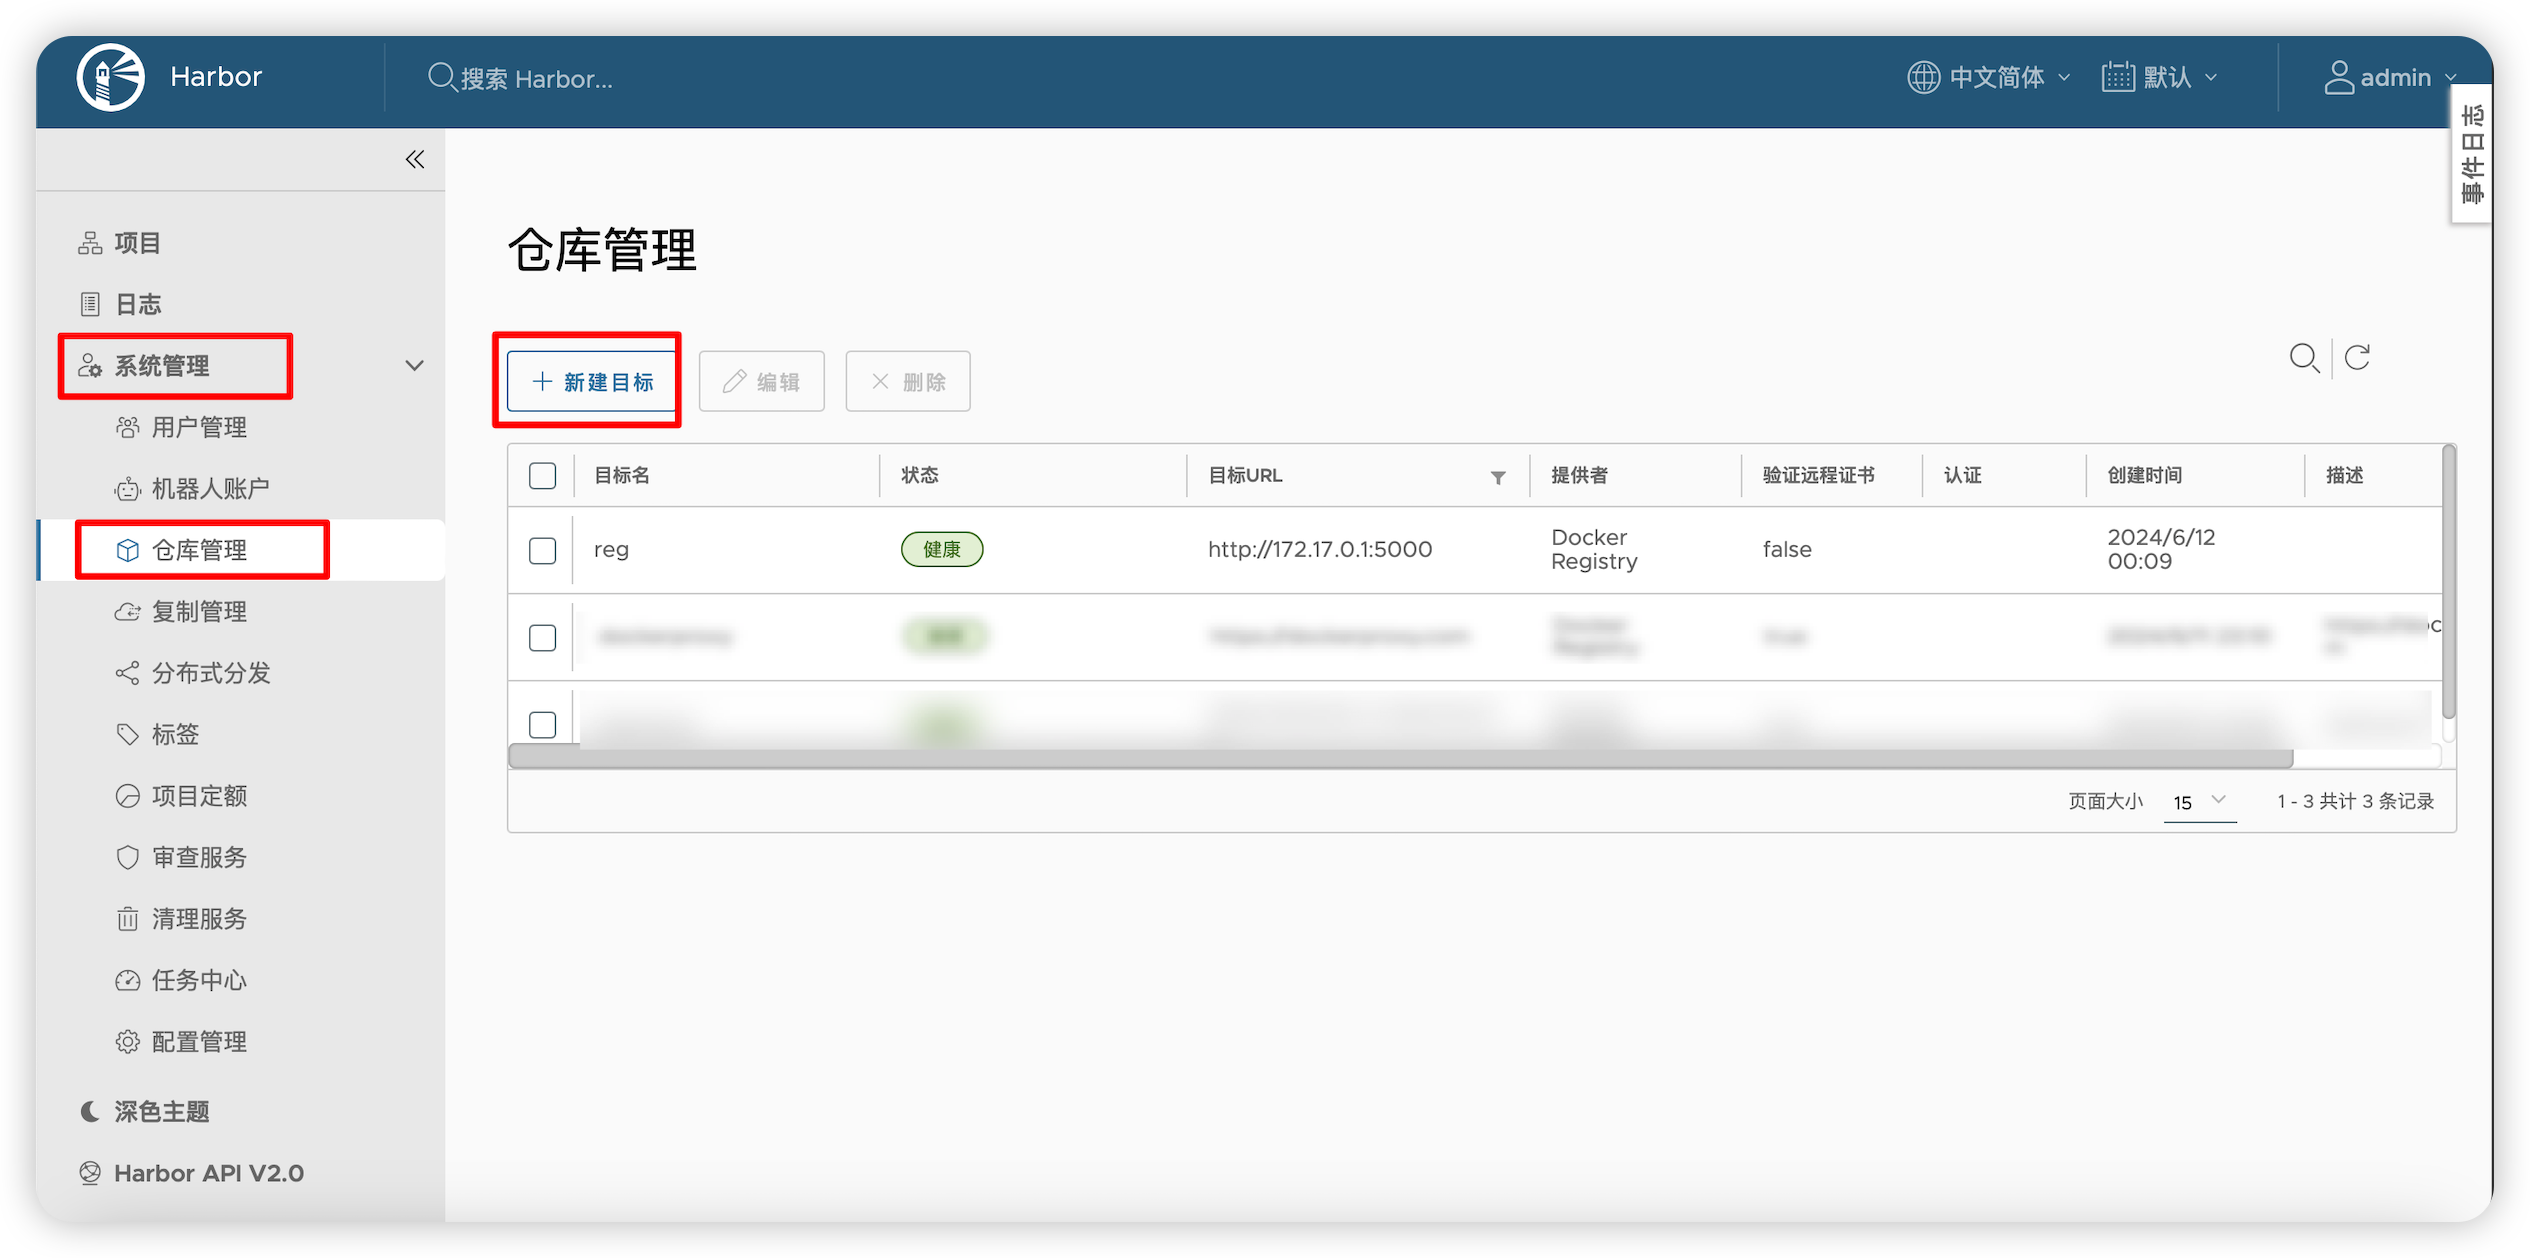
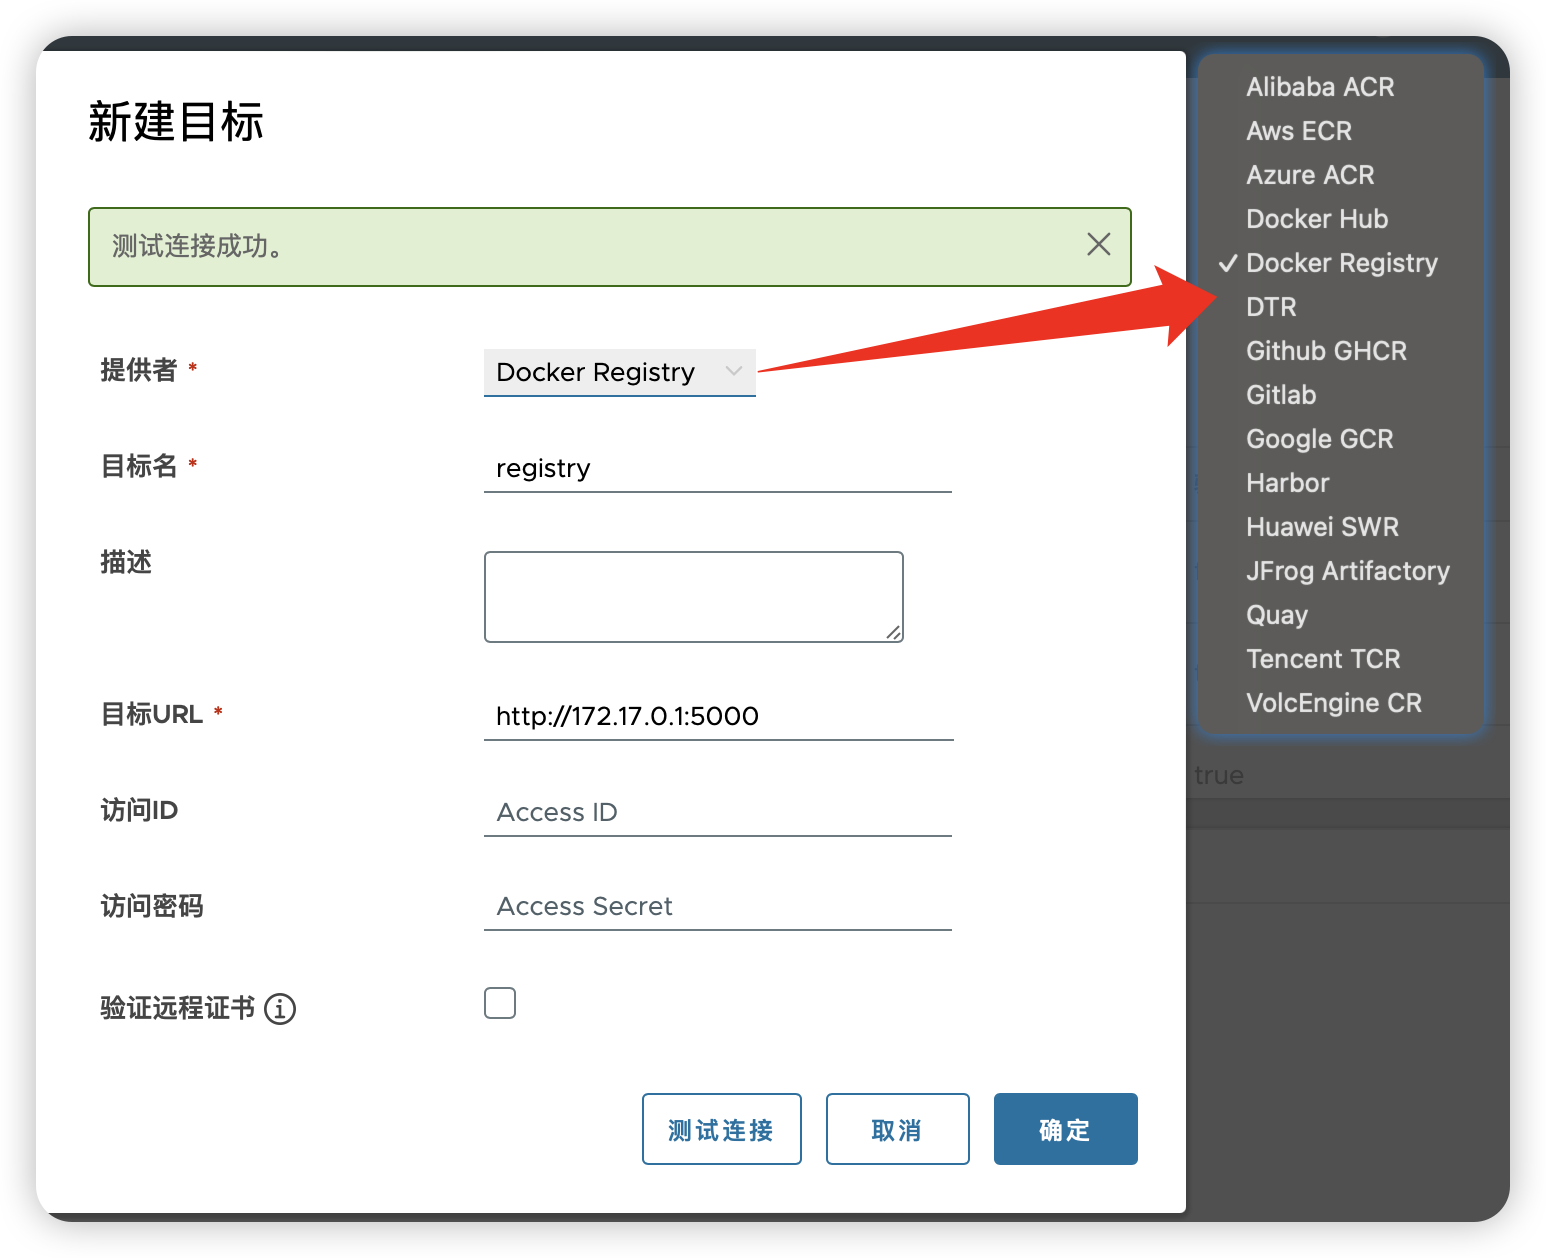
添加你准备复制过来的远程仓库
仓库管理-->新建目标
6.2 创建复制规则
备注:不推荐使用本方法(haibor自带的复制),因为即使镜像已经在harbor中了,harbor检查还是会消耗大量配额。
更推荐使用
法一中的regsync
复制管理-->新建规则
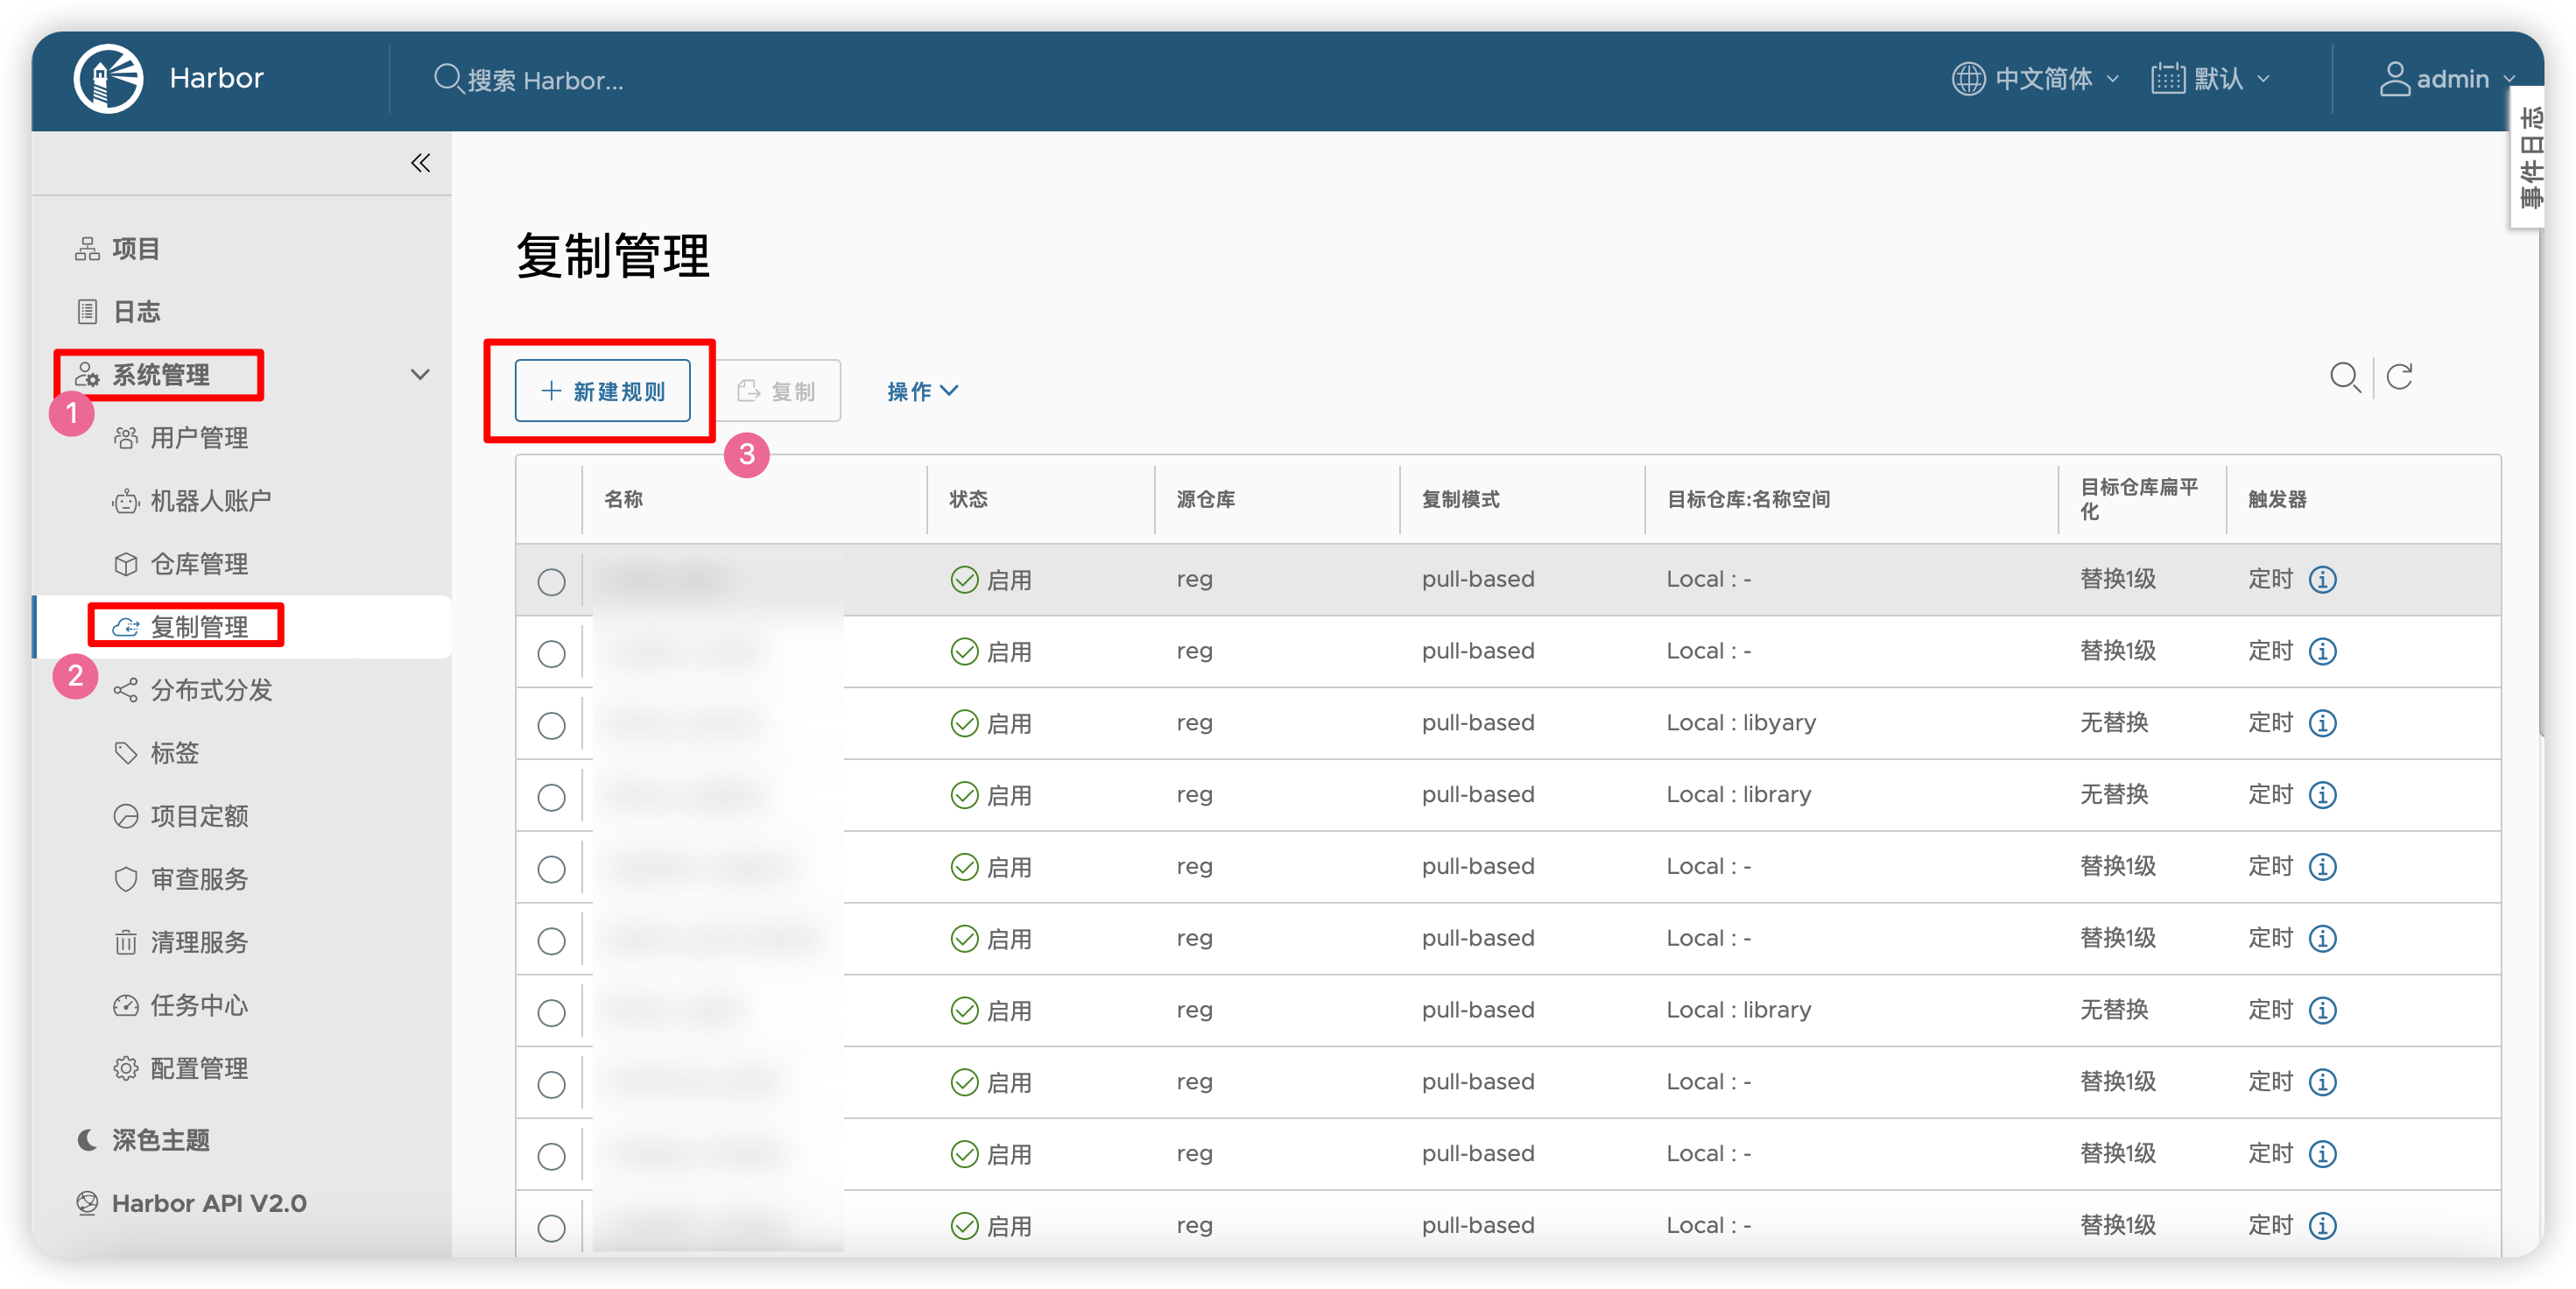
新建规则又可以分为几种大类型:
复制仓库的所有镜像,将
源资源过滤器留空即可。这样会读取仓库根目录的所有仓库中的所有镜像的所有标签,全部复制过来,如: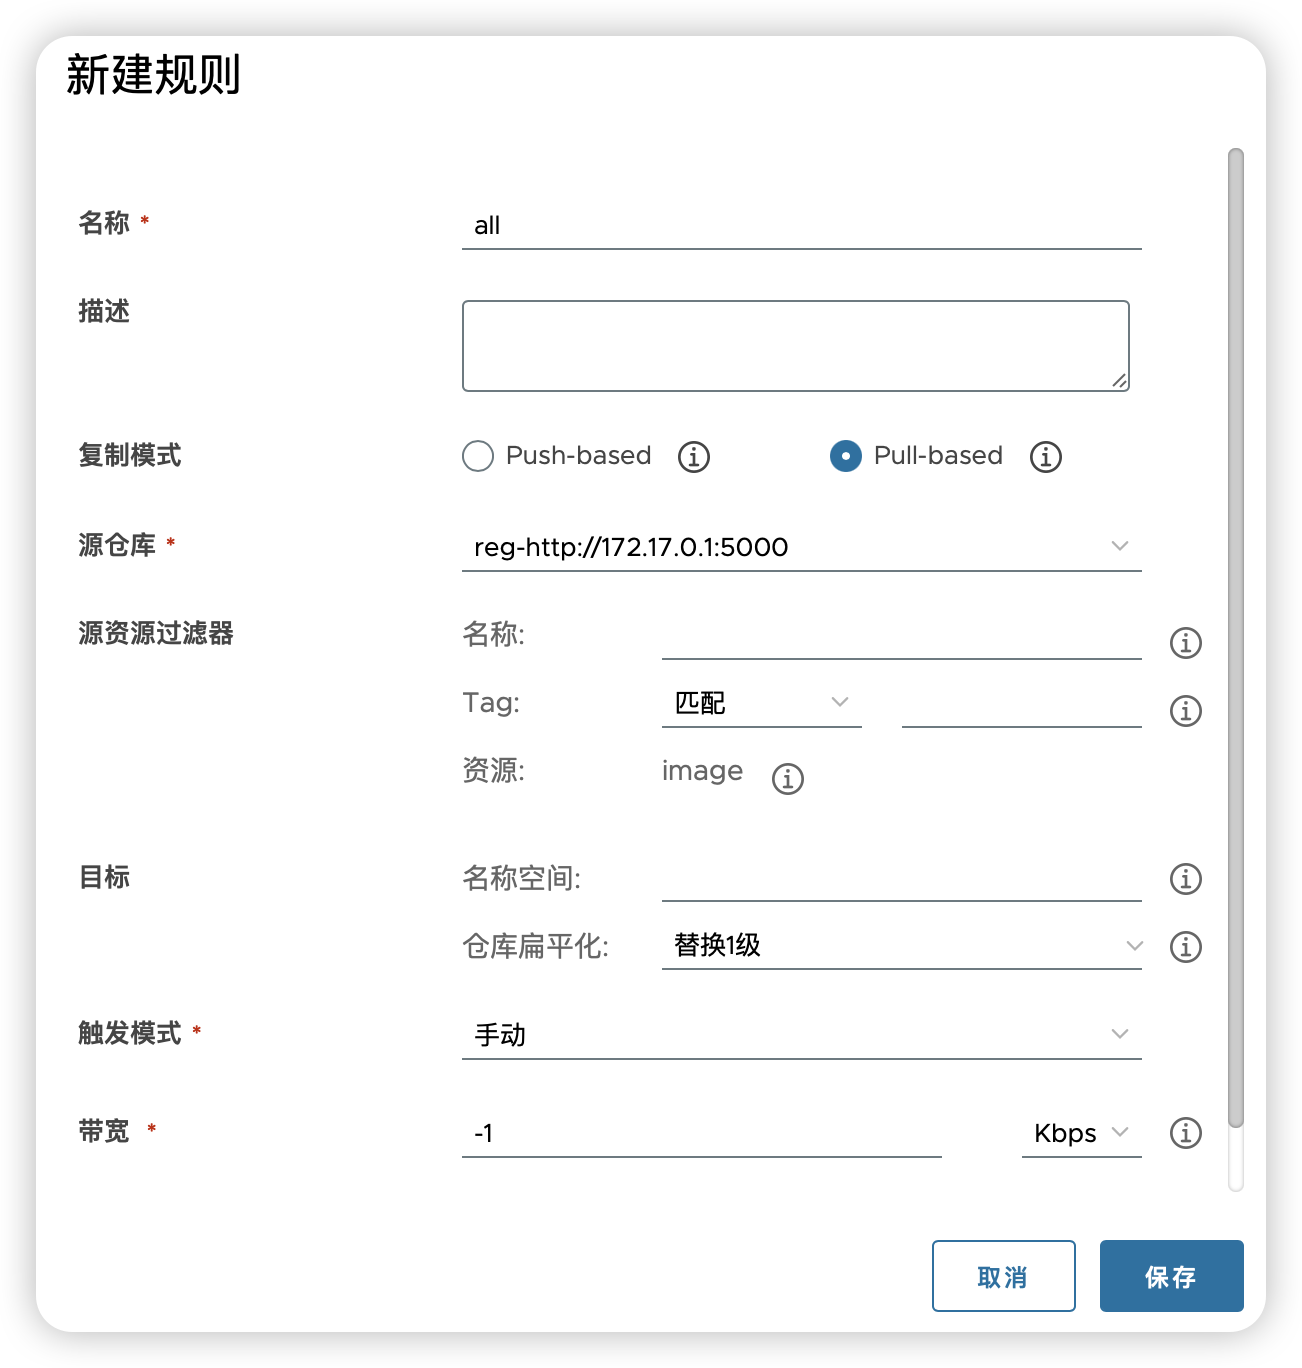
- 复制特定仓库中的某个镜像的所有标签:
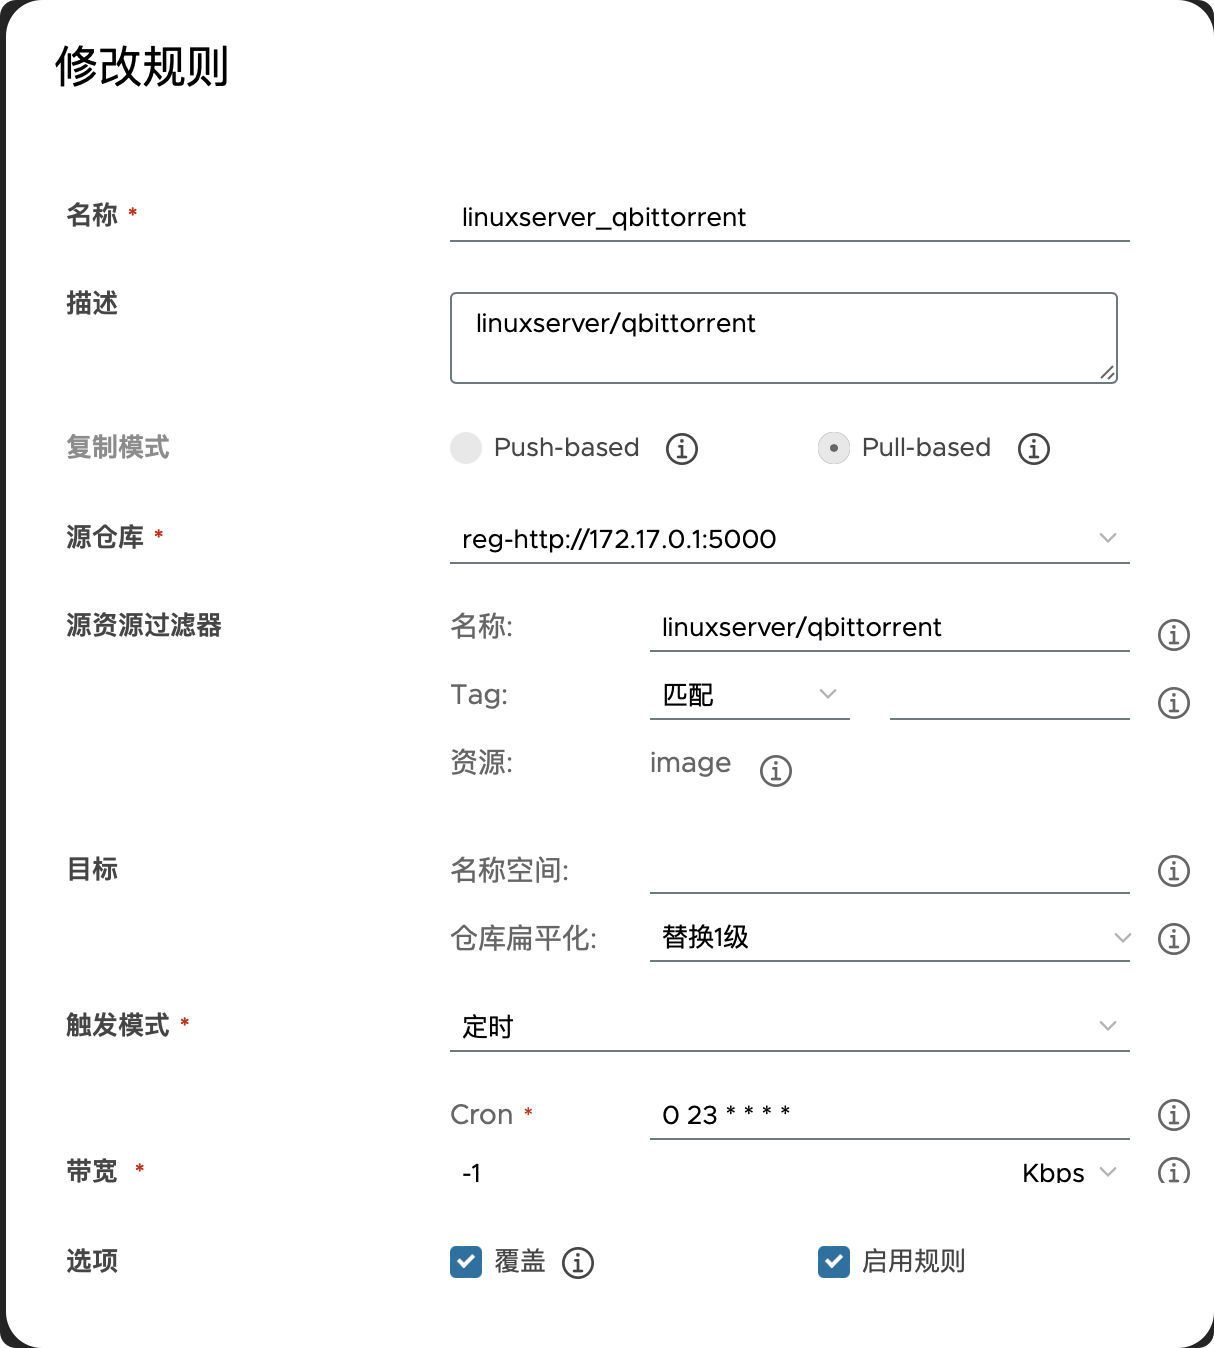
- 复制特定仓库中的某个镜像的所有标签:指定一下tag范围即可
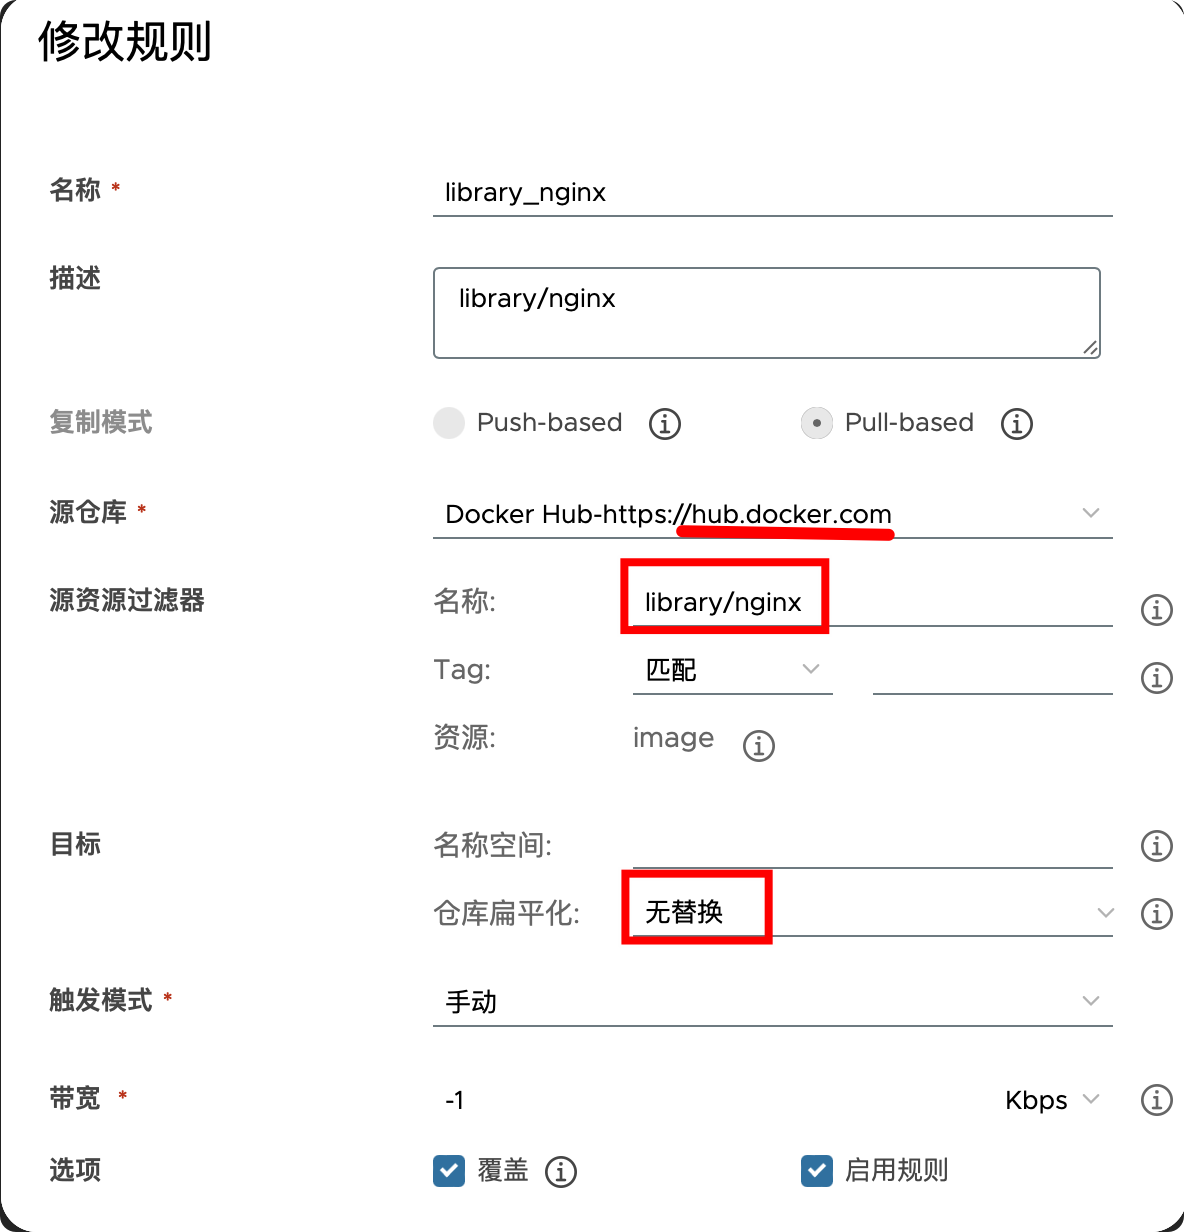
需要注意的是,dockerhub的官方镜像是以放在
library中的,虽然平时pull的时候会直接省略掉library,但这里必须写。这是docker hub的:
这是registry的:

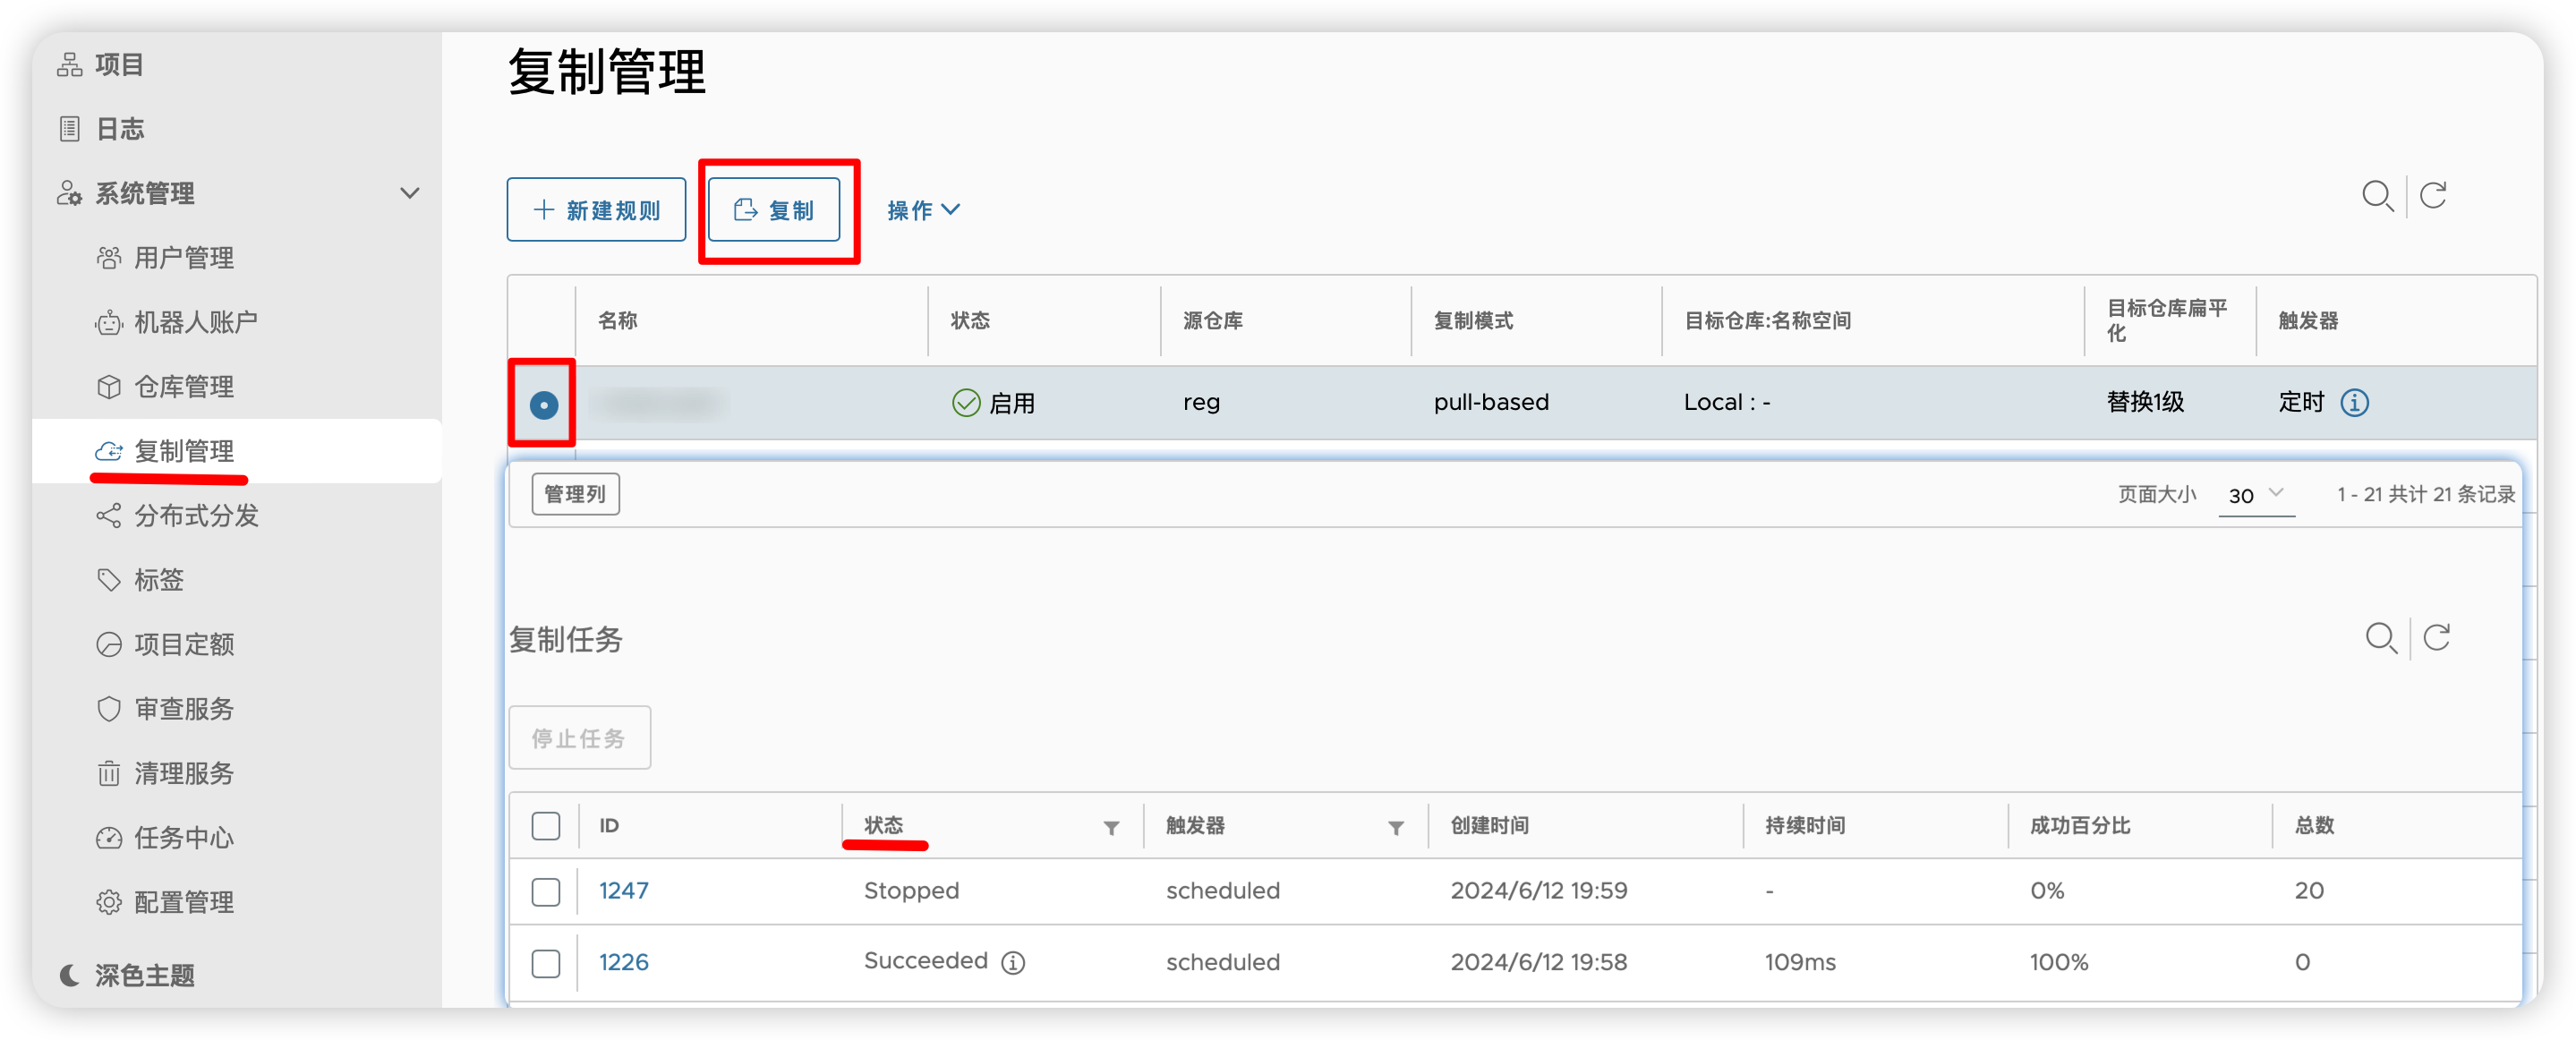
6.4 手动测试复制
可以去项目查看是否有新增:
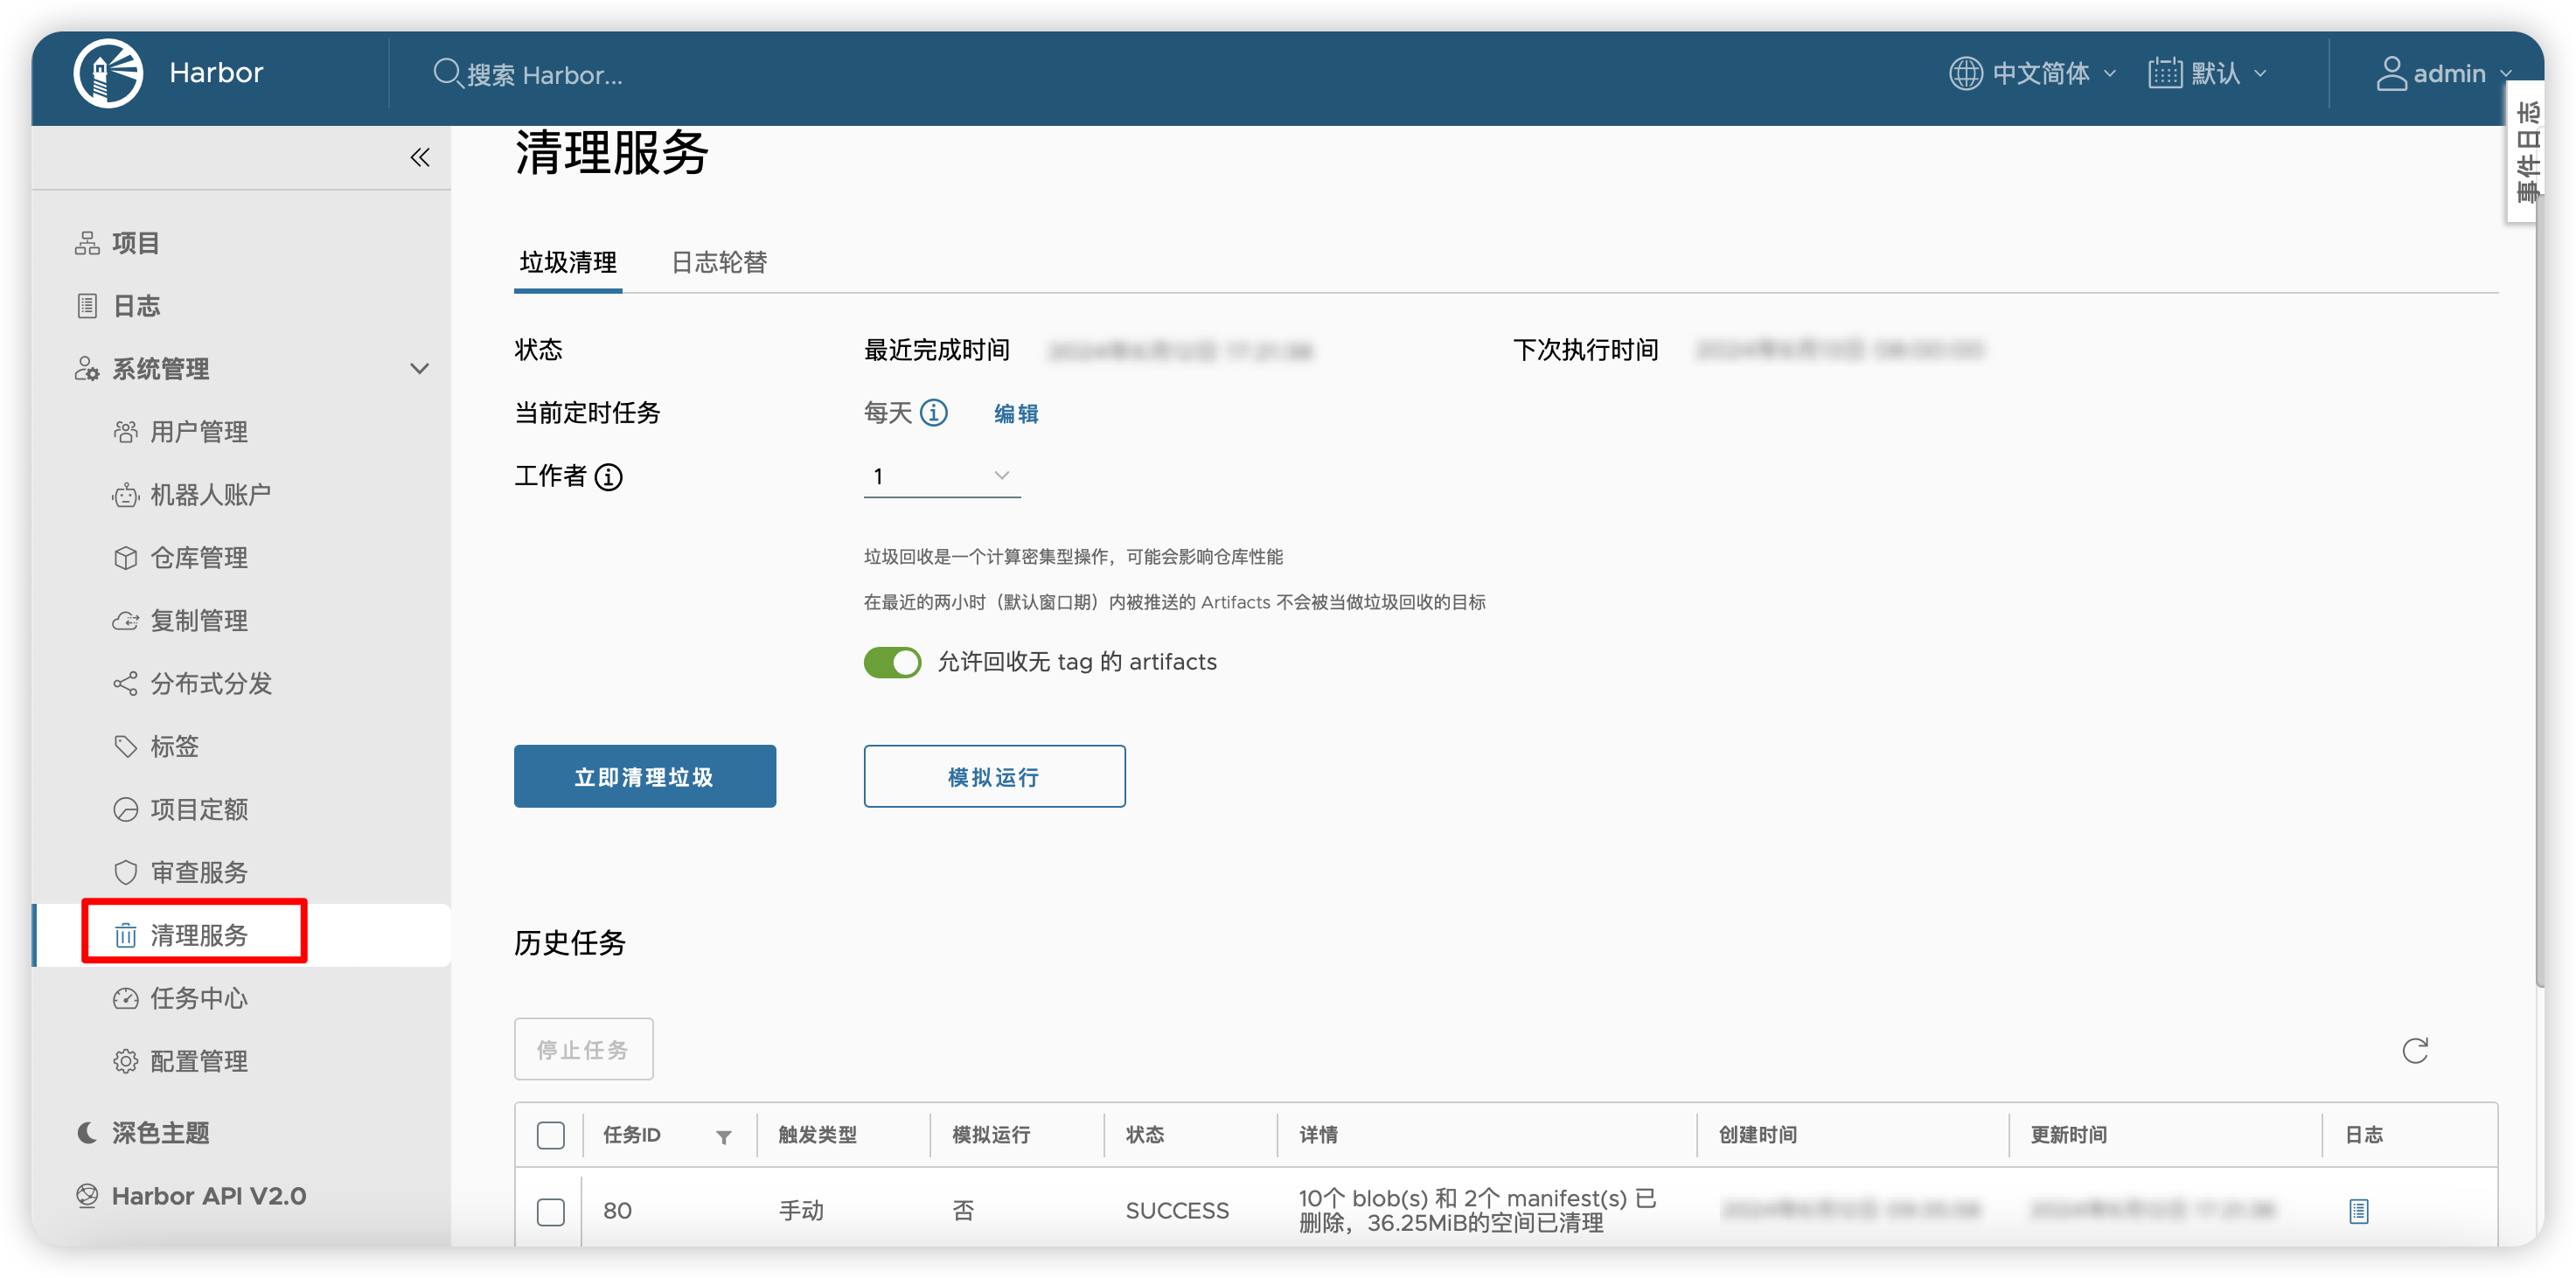
6.5 垃圾清理
关于清理服务,有一点要特别说明的是,它有一个2小时的窗口期,也就是说,两小时内你push的镜像,即使untag(或者理解为删除)了,清理服务也不会真的删除它,需等到2小时以后才会真正删除文件
6.6 任务中心
这个不难理解,都是机翻中文
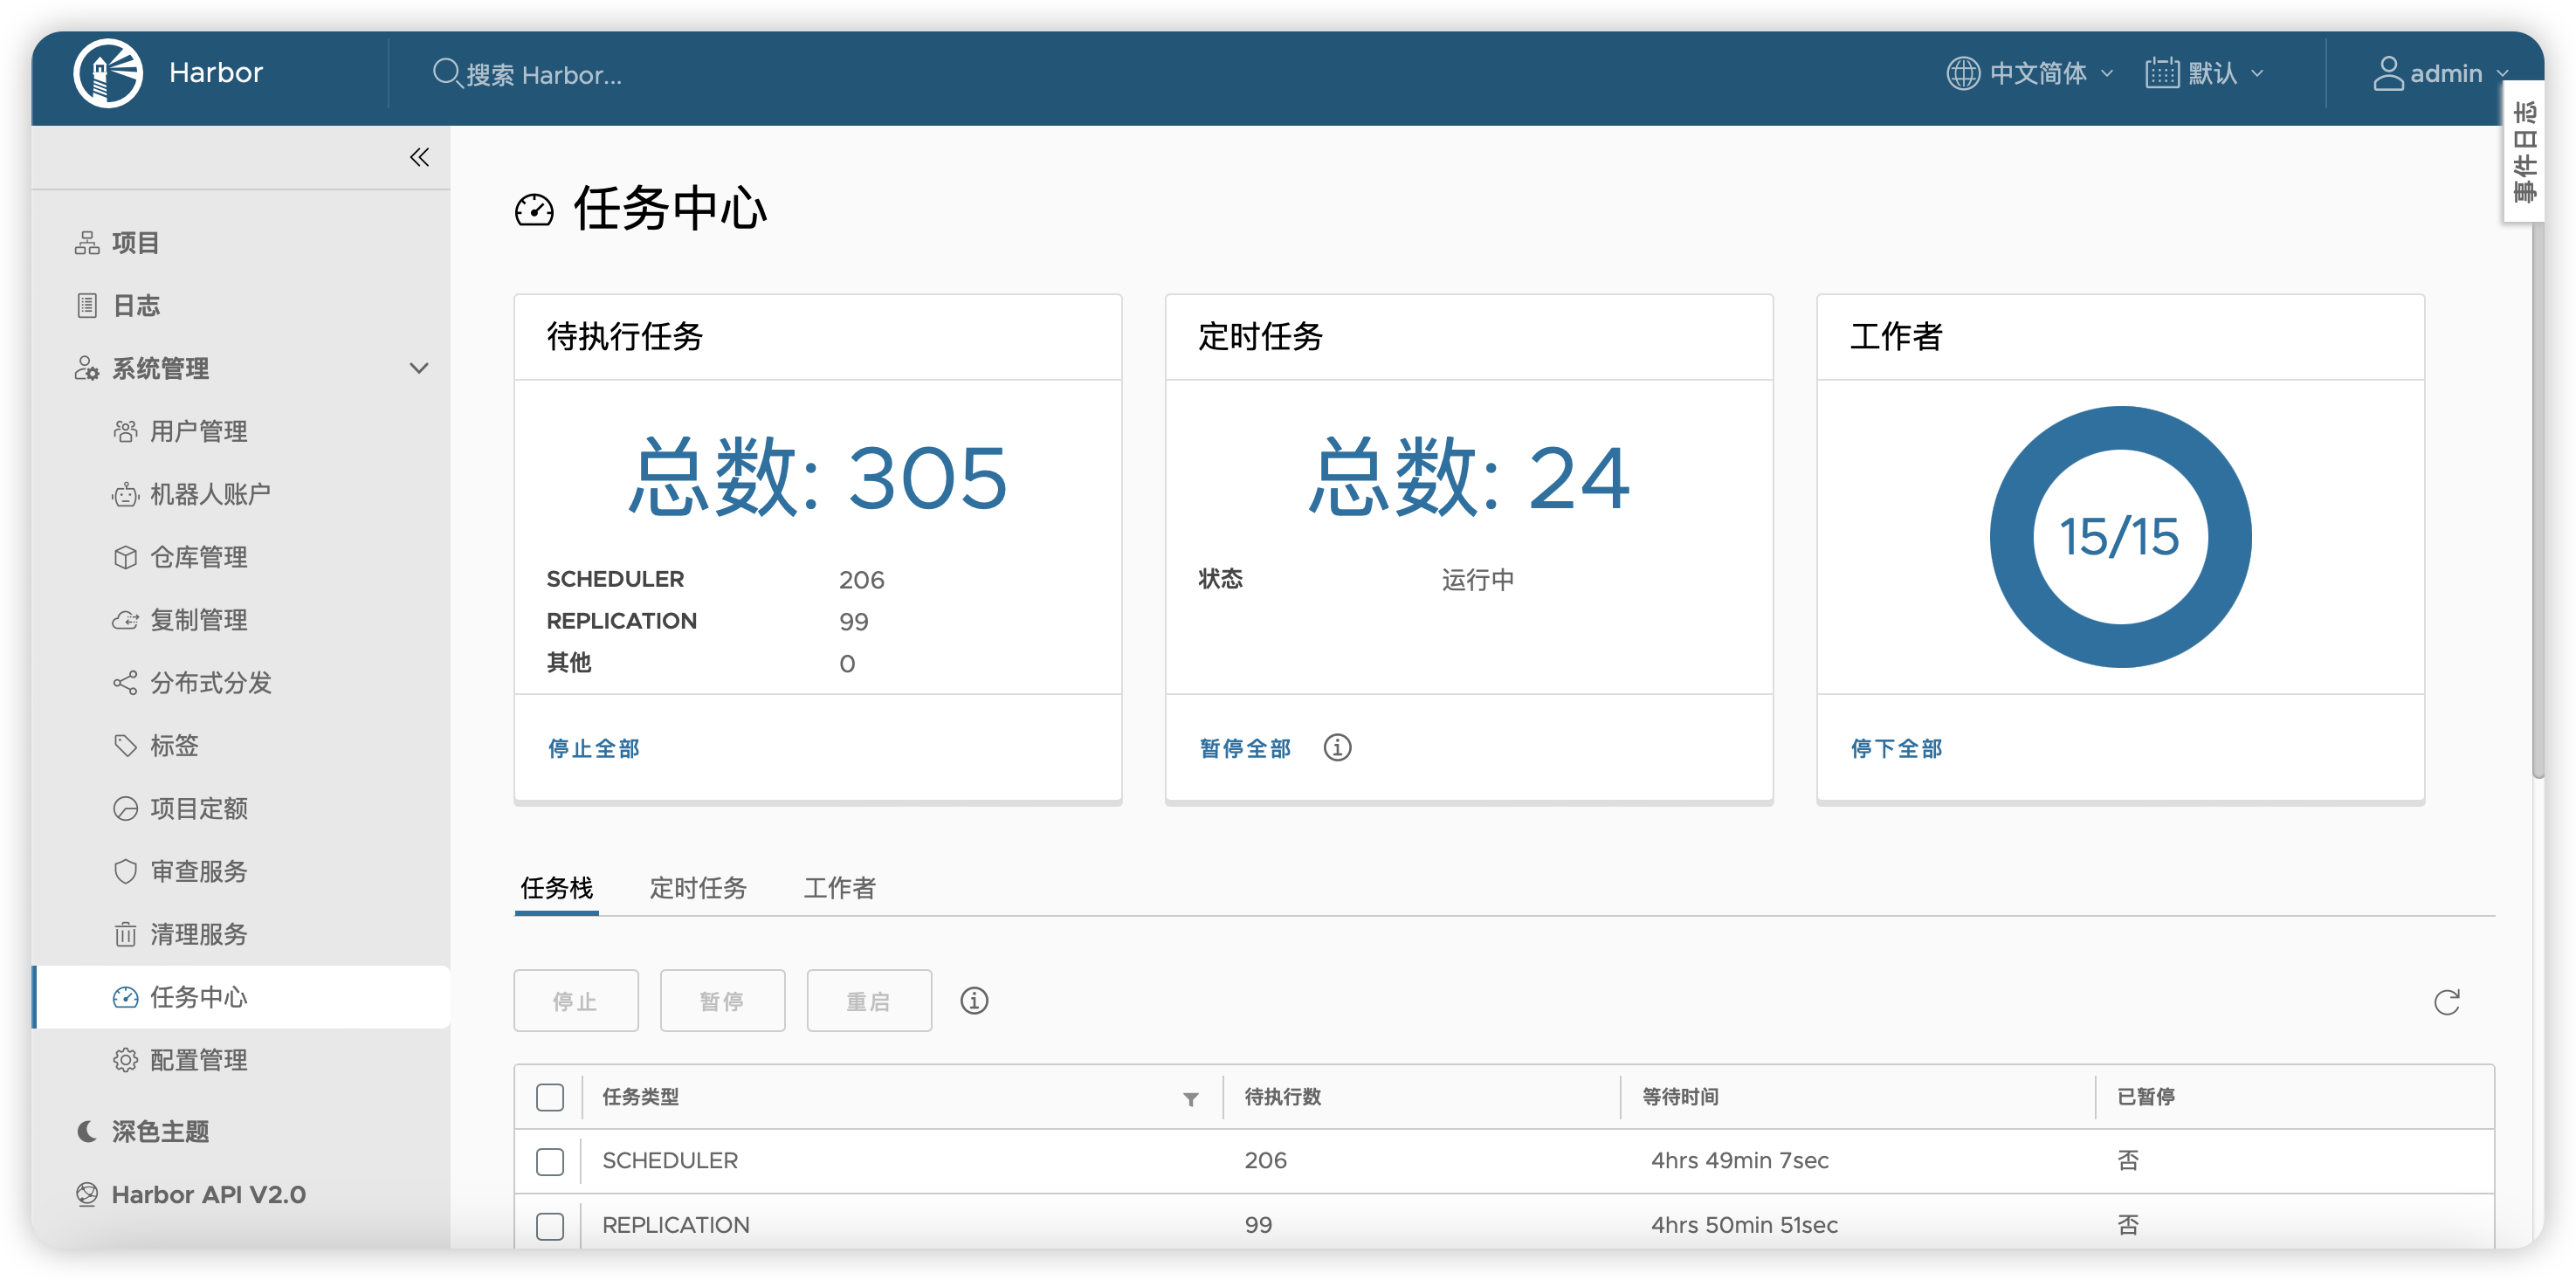
修改
workers数量,也就是上图的工作者第一次可以编辑workers是在harbor.yml中:
max_job_workers,运行install.sh以后会写入到下面的文件,手动修改即可/home/harbor/common/config/jobservice/config.yml:11: workers: 15
7.结语
其实harbor如果像让仓库显示更清晰,显示类似repo/name这样的所有镜像的列表的话,还可以再用法一中的registry套一次娃,
变成harbor-core-->harbor-nginx-->registry-->另一个nginx
获取docker hub剩余配额
Docker Hub 下载速率限制
Docker Hub 的下载速率限制是多少?
Docker Hub 根据用户拉取镜像时的账号类型限制 Docker 镜像下载或拉取的次数。拉取速率限制是基于单个 IP 地址的。
| 用户类型 | 速率限制 |
|---|---|
| 未认证用户 | 每个 IP 地址每 6 小时 100 次拉取 |
| 已认证用户 | 每 6 小时 200 次拉取 |
| 订阅了付费 Docker 订阅 的用户 | 每天最多 5000 次拉取 |
如果您需要更多的拉取次数,您还可以购买 增强服务账户附加组件。
限制的定义
用户的限制等于其个人账户或其所属任何组织的最高权限。要利用这一点,您必须以已认证用户身份登录 Docker Hub。有关更多信息,请参阅 如何认证拉取请求。未认证(匿名)用户的限制将通过 IP 强制执行。
- 拉取次数计入执行拉取的用户,而不是镜像的所有者。
- 一个拉取请求定义为对注册表清单 URL (
/v2/*/manifests/*) 进行的最多两个GET请求。 - 正常的镜像拉取只进行一次清单请求。
- 对多架构镜像的拉取请求进行两次清单请求。
HEAD请求不计数。- 通过 Docker 赞助的开源项目 和 Docker 验证发布者 计划的某些镜像是无限制的。
我怎么知道我的拉取请求受到了限制?
当您发出拉取请求并超出限制时,Docker Hub 会在请求清单时返回 429 响应代码,并显示以下内容:
You have reached your pull rate limit. You may increase the limit by authenticating and upgrading: https://www.docker.com/increase-rate-limits此错误信息将出现在 Docker CLI 或 Docker 引擎日志中。
我如何检查当前的速率?
有效的 Hub API 请求通常在响应中包含以下速率限制头:
ratelimit-limit
ratelimit-remaining
docker-ratelimit-source
这些头会在 GET 和 HEAD 请求中返回。
注意
使用 GET 模拟实际拉取并计入限制。使用 HEAD 不会。要检查您的限制,您需要安装
curl、grep和jq。
如果您是匿名拉取,请执行以下命令以获取令牌:
$ TOKEN=$(curl "https://auth.docker.io/token?service=registry.docker.io&scope=repository:ratelimitpreview/test:pull" | jq -r .token)如果您是已认证用户(在以下命令中插入您的用户名和密码):
$ TOKEN=$(curl --user 'username:password' "https://auth.docker.io/token?service=registry.docker.io&scope=repository:ratelimitpreview/test:pull" | jq -r .token)然后,运行以下命令获取显示限制的头信息:
$ curl --head -H "Authorization: Bearer $TOKEN" https://registry-1.docker.io/v2/ratelimitpreview/test/manifests/latest应返回以下头信息:
ratelimit-limit: 100;w=21600
ratelimit-remaining: 76;w=21600
docker-ratelimit-source: 192.0.2.1
在上述示例中,拉取限制为每 21600 秒(6 小时)100 次拉取,还剩 76 次拉取。
补充几个常用脚本:
1.批量获取多个用户的剩余配额
正常来说
TOKEN=$(curl --user 'username:password' "https://auth.docker.io/token?service=registry.docker.io&scope=repository:ratelimitpreview/test:pull" | jq -r .token)
curl --head -H "Authorization: Bearer $TOKEN" https://registry-1.docker.io/v2/ratelimitpreview/test/manifests/latest
把这个粘贴进终端就会返回配额了,但账号多了显得麻烦,写了个脚本
#!/bin/bash

# 定义用户数组
declare -a users=(
    "username:password"
    "username:password"
    "username:password"
    "username:password"
    "username:password"
    "username:password"
    "username:password"
    "username:password"
    "username:password"
    "username:password"
    "username:password"
    "username:password"
    "username:password"
    "username:password"
)

# 临时文件路径
temp_file=$(mktemp)

# 定义计数器
counter=0

# 定义并行获取函数
get_ratelimit() {
    local username="$1"
    local password="$2"
    local count="$3"

    TOKEN=$(curl -s --user "$username:$password" "https://auth.docker.io/token?service=registry.docker.io&scope=repository:ratelimitpreview/test:pull" | jq -r .token)

    if [ -n "$TOKEN" ]; then
        result=$(curl -s -I -H "Authorization: Bearer $TOKEN" https://registry-1.docker.io/v2/ratelimitpreview/test/manifests/latest)
        remaining=$(echo "$result" | grep -i 'ratelimit-remaining:' | awk '{print $2}' | cut -d ';' -f 1)
        echo "$count:$remaining:$username" >> "$temp_file"
    else
        echo "$count:$username: Failed to obtain token." >> "$temp_file"
    fi
}

# 循环遍历每个用户,启动并行处理
for user in "${users[@]}"; do
    username=$(echo "$user" | cut -d ':' -f 1)
    password=$(echo "$user" | cut -d ':' -f 2)

    # 增加计数器
    (( counter++ ))

    # 调用函数并将进程放入后台执行,传递计数器作为参数
    get_ratelimit "$username" "$password" "$counter" &
done

# 等待所有后台进程执行完毕
wait
echo $(date)
echo ""

# 按计数器顺序输出结果,并使用 awk 格式化输出
sort -n -t':' -k 1 "$temp_file" | awk -F':' '{ printf("%3d - hub%-2d - %-20s\n", $2, NR, $3) }'

# 删除临时文件
rm "$temp_file"
脚本会返回:
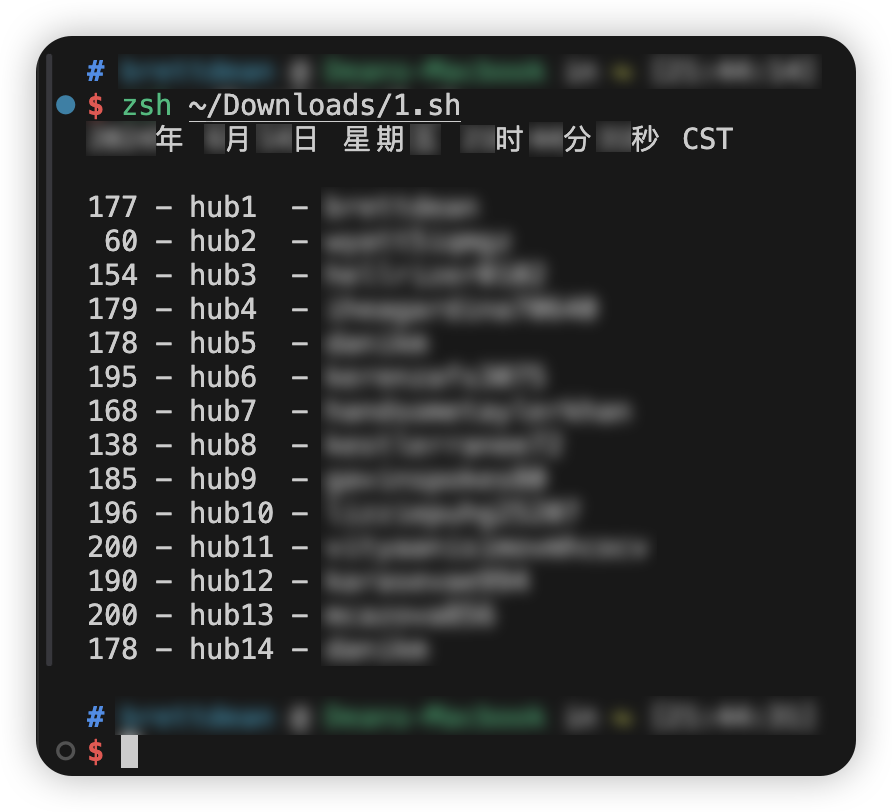
当数字降低到0的时候,pull请求就会报错429
这个6小时的200个配额,他不是一下子就恢复的,他是一个一个慢慢涨到200
2.打印docker hub特定镜像所有tag,获取tag总数
printTags.sh
#!/bin/bash

userRepo=$1
tag_count=0

function list_tags() {
    local page_num=1
    local page_size=100

    while true; do
        local tags_json=$(curl -s "https://registry.hub.docker.com/v2/repositories/${userRepo}/tags/?page=${page_num}&page_size=${page_size}")

        if [[ $(echo "${tags_json}" | jq -r '.results | length') -eq 0 ]]; then
            break
        fi

        local tags=$(echo "${tags_json}" | jq -r '.results[].name')
        local tags_count=$(echo "${tags_json}" | jq -r '.count')
        tag_count=${tags_count}

        echo "${tags}"

        ((page_num++))
    done
}

list_tags "${userRepo}"
echo "There're ${tag_count} tags in ${userRepo}"